Toshiba PA5066U-1C0R Camileo BW20 User Guide - Page 17
Inserting and removing a Micro SD™ Card, Micro SD™, or Micro SDXC™ memory card.
 |
View all Toshiba PA5066U-1C0R Camileo BW20 manuals
Add to My Manuals
Save this manual to your list of manuals |
Page 17 highlights
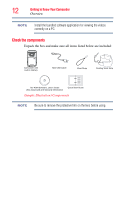
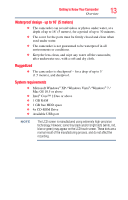
Getting Started 17 Inserting and removing a Micro SD™ Card To charge your camcorder through the supplied USB cable, follow these steps: 1 Connect your camcorder's mini USB port to a USB port on your computer, with the supplied USB cable. The blinking light indicates that the battery is currently charging; the light glows continuously once charging is completed. Charging the battery through the USB cable takes approximately 5 hours. (Actual charging time will vary, depending on battery condition and charging conditions, including power availability from the computer's USB port.) Never charge the battery by a method other than as instructed. Doing so may cause a fire or explosion possibly resulting in serious injury. Inserting and removing a Micro SD™ Card NOTE A Micro SD™ Card may need to be purchased separately. Your camcorder comes with a Micro SD™ Card slot that allows you to expand the camcorder's memory capacity with an optional Micro SD™, Micro SDHC™, or Micro SDXC™ memory card. 1 Open the ports cover. 2 Insert the Micro SD™ card (optional) into the slot until it locks properly. 3 To remove the Micro SD™ card, press inward to release it and gently pull it out. 4 Close the ports cover. To remove the Micro SD™ Card, press inward to release it. When the card pops out, grasp it and pull it straight out. (Sample Illustration) Inserting / removing a Micro SD™ Card
-
 1
1 -
2
-
3
-
4
-
5
-
6
-
7
-
8
-
9
-
10
-
11
-
 12
12 -
 13
13 -
 14
14 -
 15
15 -
 16
16 -
 17
17 -
 18
18 -
 19
19 -
 20
20 -
 21
21 -
 22
22 -
23
-
24
-
25
-
26
-
27
-
28
-
29
-
30
-
31
-
32
-
33
-
34
-
35
-
36
-
37
-
38
-
39
-
40
-
41
-
42
-
43
-
44
-
45
-
46
-
47
-
48
-
49
-
50
-
51
-
52
-
53
-
54
-
55
-
56
-
57
-
58
-
59
-
60
-
61
-
62
-
63
-
64
-
65
-
66
-
67
-
68
-
69
-
70
-
71
-
72
-
73
-
74
-
75
-
76
-
77
-
78
-
79
-
80
-
81
-
82
-
83
-
84
-
85
-
86
-
87
-
88
-
89
-
90
-
91
-
92
-
93
-
94
-
95
-
96
-
97
-
98
-
99
-
100
-
101
-
102
-
103
-
104
-
105
-
106
-
107
-
108
-
109
-
110
-
111
-
112
-
113
 |
 |
