Toshiba Portege R30-A PT341C-01000T Users Manual Canada; English - Page 61
Optical disc drives, Formats
 |
View all Toshiba Portege R30-A PT341C-01000T manuals
Add to My Manuals
Save this manual to your list of manuals |
Page 61 highlights
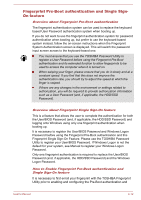
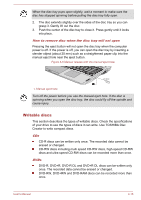
Single Sign-On feature. You should check that your fingerprint is enrolled before configuring the settings. 1. Logon as Administrator (means a user has administrator privileges). 2. In the TOSHIBA Fingerprint Utility main menu, click Run As Administrator. 3. User Account Control window is displayed. Click Yes. 4. Swipe your finger across the fingerprint sensor. 5. Select Setting in the main menu to open the Setting window. You can: Select Pre-Boot authentication check box if you want to use the fingerprint Pre-Boot authentication feature. Select Pre-Boot authentication and Single Sign-On check boxes if you want to use the Single Sign-On feature. 6. Click Apply. 7. "Save successfully" is displayed. Click OK. 8. Click Close. 9. "Do you want to quit?" is displayed. Click OK. It will be returned to the TOSHIBA Fingerprint Utility main menu. This modified configuration for fingerprint Pre-Boot authentication and Single Sign-On feature becomes effective the next time the system is booted up. Optical disc drives Some models are equipped with a Optical disc drive. When the computer is accessing an optical disc, the indicator on the drive glows. Formats The drives support the following formats. DVD Super Multi drive The drive supports the following formats: CD-ROM, DVD-ROM, DVDVideo, CD-DA, CD-Text, Photo CD™ (single/multi-session), CD-ROM Mode 1/Mode 2, CD-ROM XA Mode 2 (Form1, Form2), Enhanced CD (CDEXTRA), Addressing Method 2, DVD-R, DVD-RW, DVD+R, DVD+RW, DVD-RAM, DVD-R DL (Format1), DVD+R DL. Blu-ray™ Writer drive BDXL™ The drive supports the following formats: CD-ROM, DVD-ROM, DVDVideo, CD-DA, CD-Text, Photo CD™ (single/multi-session), CD-ROM Mode 1/Mode 2, CD-ROM XA Mode 2 (Form1, Form2), Enhanced CD (CDEXTRA), Addressing Method 2, DVD-R, DVD-RW, DVD+R, DVD+RW, DVD-RAM, DVD-R DL (Format1), DVD+R DL, BD-ROM, BD-ROM DL, BDR, BD-R DL, BD-RE, BD-RE DL,BD-R TL, BD-R QL and BD-RE TL. User's Manual 4-13
-
 1
1 -
2
-
3
-
4
-
5
-
6
-
7
-
8
-
9
-
10
-
11
-
12
-
13
-
14
-
15
-
16
-
17
-
18
-
19
-
20
-
21
-
22
-
23
-
24
-
25
-
26
-
27
-
28
-
29
-
30
-
31
-
32
-
33
-
34
-
35
-
36
-
37
-
38
-
39
-
40
-
41
-
42
-
43
-
44
-
45
-
46
-
47
-
48
-
49
-
50
-
51
-
52
-
53
-
54
-
55
-
 56
56 -
 57
57 -
 58
58 -
 59
59 -
 60
60 -
 61
61 -
 62
62 -
 63
63 -
 64
64 -
 65
65 -
 66
66 -
67
-
68
-
69
-
70
-
71
-
72
-
73
-
74
-
75
-
76
-
77
-
78
-
79
-
80
-
81
-
82
-
83
-
84
-
85
-
86
-
87
-
88
-
89
-
90
-
91
-
92
-
93
-
94
-
95
-
96
-
97
-
98
-
99
-
100
-
101
-
102
-
103
-
104
-
105
-
106
-
107
-
108
-
109
-
110
-
111
-
112
-
113
-
114
-
115
-
116
-
117
-
118
-
119
-
120
-
121
-
122
-
123
-
124
-
125
-
126
-
127
-
128
-
129
-
130
-
131
-
132
-
133
-
134
-
135
-
136
-
137
-
138
-
139
-
140
-
141
-
142
-
143
-
144
-
145
-
146
-
147
-
148
-
149
-
150
-
151
-
152
-
153
-
154
-
155
-
156
 |
 |