Toshiba Satellite E200 PSE20C-002002 Users Manual Canada; English - Page 85
Optical Drive Auto Lock, Setting the Optical Drive Auto Lock
 |
View all Toshiba Satellite E200 PSE20C-002002 manuals
Add to My Manuals
Save this manual to your list of manuals |
Page 85 highlights
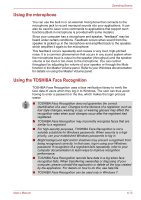
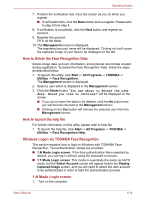
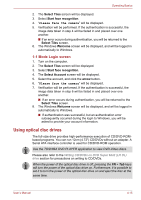
Operating Basics 1.EJECT BUTTON 2.OPTICAL DISC DRIVE SLOT Figure 4-6 Pressing the eject button 3. Gently hold the CD/DVD by the edges and pull it horizontally. Figure 4-7 Removing a CD/DVD Optical Drive Auto Lock This function is provided with some models. This function automatically locks the optical disc drive eject button if the computer detects any vibration or other shochks while running on the battery. This function prevents the disc from being ejected even if the eject button is pushed unexpectedly. When the Optical Drive Auto Lock is on, there will be key mark on the bottom right of the Optical Drive Power icon in the Taskbar. To enable this function, turn the Optical Drive Power ON. Setting the Optical Drive Auto Lock Right click the Optical Drive Power icon in the Taskbar to change the Optical Drive Auto Lock settings. User's Manual 4-17
-
 1
1 -
2
-
3
-
4
-
5
-
6
-
7
-
8
-
9
-
10
-
11
-
12
-
13
-
14
-
15
-
16
-
17
-
18
-
19
-
20
-
21
-
22
-
23
-
24
-
25
-
26
-
27
-
28
-
29
-
30
-
31
-
32
-
33
-
34
-
35
-
36
-
37
-
38
-
39
-
40
-
41
-
42
-
43
-
44
-
45
-
46
-
47
-
48
-
49
-
50
-
51
-
52
-
53
-
54
-
55
-
56
-
57
-
58
-
59
-
60
-
61
-
62
-
63
-
64
-
65
-
66
-
67
-
68
-
69
-
70
-
71
-
72
-
73
-
74
-
75
-
76
-
77
-
78
-
79
-
 80
80 -
 81
81 -
 82
82 -
 83
83 -
 84
84 -
 85
85 -
 86
86 -
 87
87 -
 88
88 -
 89
89 -
 90
90 -
91
-
92
-
93
-
94
-
95
-
96
-
97
-
98
-
99
-
100
-
101
-
102
-
103
-
104
-
105
-
106
-
107
-
108
-
109
-
110
-
111
-
112
-
113
-
114
-
115
-
116
-
117
-
118
-
119
-
120
-
121
-
122
-
123
-
124
-
125
-
126
-
127
-
128
-
129
-
130
-
131
-
132
-
133
-
134
-
135
-
136
-
137
-
138
-
139
-
140
-
141
-
142
-
143
-
144
-
145
-
146
-
147
-
148
-
149
-
150
-
151
-
152
-
153
-
154
-
155
-
156
-
157
-
158
-
159
-
160
-
161
-
162
-
163
-
164
-
165
-
166
-
167
-
168
-
169
-
170
-
171
-
172
-
173
-
174
-
175
-
176
-
177
-
178
-
179
-
180
-
181
-
182
-
183
-
184
-
185
-
186
-
187
-
188
 |
 |
