Toshiba Satellite P70 User Guide - Page 86
Media control buttons, Inserting an optical disc, Sample Illustration Media control buttons
 |
View all Toshiba Satellite P70 manuals
Add to My Manuals
Save this manual to your list of manuals |
Page 86 highlights
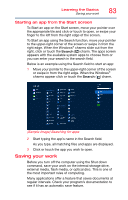
86 Learning the Basics Using the optical disc drive Media control buttons The media control buttons located above the keyboard allow you mute the sound and play audio CDs or DVD movies when the computer is on. Play/pause button Previous track button Next track button Volume decrease button Volume increase button Mute button (Sample Illustration) Media control buttons The Previous track button allows you to restart playing the current track or go to the previous track. The Play/pause button allows you to start playing or pause the media currently playing. The Next track button allows you to go to the next track. The Volume decrease button decreases the volume. The Volume increase button increases the volume. The Mute button enables/disables volume mute. Inserting an optical disc To insert an optical disc into the drive: 1 Make sure the computer is turned on. 2 Make sure the drive's in-use indicator light is off. 3 Press the drive's eject button. 4 Hold the disc by its edges and check that it is free of dust. If the disc is dusty, clean it. 5 Place the disc carefully in the disc tray, label side up, and gently press the disc onto the center spindle until it clicks into place.
-
 1
1 -
2
-
3
-
4
-
5
-
6
-
7
-
8
-
9
-
10
-
11
-
12
-
13
-
14
-
15
-
16
-
17
-
18
-
19
-
20
-
21
-
22
-
23
-
24
-
25
-
26
-
27
-
28
-
29
-
30
-
31
-
32
-
33
-
34
-
35
-
36
-
37
-
38
-
39
-
40
-
41
-
42
-
43
-
44
-
45
-
46
-
47
-
48
-
49
-
50
-
51
-
52
-
53
-
54
-
55
-
56
-
57
-
58
-
59
-
60
-
61
-
62
-
63
-
64
-
65
-
66
-
67
-
68
-
69
-
70
-
71
-
72
-
73
-
74
-
75
-
76
-
77
-
78
-
79
-
80
-
 81
81 -
 82
82 -
 83
83 -
 84
84 -
 85
85 -
 86
86 -
 87
87 -
 88
88 -
 89
89 -
 90
90 -
 91
91 -
92
-
93
-
94
-
95
-
96
-
97
-
98
-
99
-
100
-
101
-
102
-
103
-
104
-
105
-
106
-
107
-
108
-
109
-
110
-
111
-
112
-
113
-
114
-
115
-
116
-
117
-
118
-
119
-
120
-
121
-
122
-
123
-
124
-
125
-
126
-
127
-
128
-
129
-
130
-
131
-
132
-
133
-
134
-
135
-
136
-
137
-
138
-
139
-
140
-
141
-
142
-
143
-
144
-
145
-
146
-
147
-
148
-
149
-
150
-
151
-
152
-
153
-
154
-
155
-
156
-
157
-
158
-
159
-
160
-
161
-
162
-
163
-
164
-
165
-
166
-
167
-
168
-
169
-
170
-
171
-
172
-
173
-
174
-
175
-
176
-
177
-
178
-
179
-
180
-
181
-
182
-
183
-
184
-
185
-
186
-
187
-
188
-
189
-
190
-
191
-
192
-
193
-
194
-
195
-
196
 |
 |
