Toshiba Satellite Pro L300-EZ1521 User Manual - Page 135
HDMI, Auto-Selected, LCD+Analog RGB, Display
 |
View all Toshiba Satellite Pro L300-EZ1521 manuals
Add to My Manuals
Save this manual to your list of manuals |
Page 135 highlights
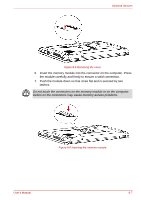
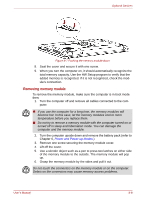
HDMI Optional Devices When you turn on the power, the computer automatically recognizes the monitor and determines whether it is color or monochrome. You can use the HW Setup to select between Auto-Selected and LCD+Analog RGB displays. Refer to Chapter 7, HW Setup and Passwords. If you have selected LCD+Analog RGB under the Display options of the HW Setup, both the external monitor and the internal LCD will be active when you turn on the computer. If Auto-Selected is selected, only the external monitor will be active. To change the display settings, press FN + F5. If you disconnect the monitor before you turn the computer off, be sure to press FN + F5 to switch to the internal display. Refer to Chapter 5, The Keyboard, for details on using hot keys to change the display setting. If you set LCD+Analog RGB for the computer's display, you must set the computer's display resolution to the same as that of the external monitor or other device, such as a projector. Some models are equipped with HDMI out port than can send/receive video, audio and control signals by connecting with external display/audio devices.1080p, 720p, 576p and 480p signal formats can be supported, but actually available signal format depends on each HDMI devices. To connect external devices, follow the steps as detailed below: As the port operation of all HDMI (High-Definition Multimedia Interface) monitors has not been confirmed, some HDMI monitors may not function properly. 1. Plug one end of the HDMI cable into the HDMI port of the HDMI device. Figure 8-9 Connecting a HDMI cable 2. Plug the other end of the HDMI cable into the HDMI out port on your computer. User's Manual 8-10
-
 1
1 -
2
-
3
-
4
-
5
-
6
-
7
-
8
-
9
-
10
-
11
-
12
-
13
-
14
-
15
-
16
-
17
-
18
-
19
-
20
-
21
-
22
-
23
-
24
-
25
-
26
-
27
-
28
-
29
-
30
-
31
-
32
-
33
-
34
-
35
-
36
-
37
-
38
-
39
-
40
-
41
-
42
-
43
-
44
-
45
-
46
-
47
-
48
-
49
-
50
-
51
-
52
-
53
-
54
-
55
-
56
-
57
-
58
-
59
-
60
-
61
-
62
-
63
-
64
-
65
-
66
-
67
-
68
-
69
-
70
-
71
-
72
-
73
-
74
-
75
-
76
-
77
-
78
-
79
-
80
-
81
-
82
-
83
-
84
-
85
-
86
-
87
-
88
-
89
-
90
-
91
-
92
-
93
-
94
-
95
-
96
-
97
-
98
-
99
-
100
-
101
-
102
-
103
-
104
-
105
-
106
-
107
-
108
-
109
-
110
-
111
-
112
-
113
-
114
-
115
-
116
-
117
-
118
-
119
-
120
-
121
-
122
-
123
-
124
-
125
-
126
-
127
-
128
-
129
-
 130
130 -
 131
131 -
 132
132 -
 133
133 -
 134
134 -
 135
135 -
 136
136 -
 137
137 -
 138
138 -
 139
139 -
 140
140 -
141
-
142
-
143
-
144
-
145
-
146
-
147
-
148
-
149
-
150
-
151
-
152
-
153
-
154
-
155
-
156
-
157
-
158
-
159
-
160
-
161
-
162
-
163
-
164
-
165
-
166
-
167
-
168
-
169
-
170
-
171
-
172
-
173
-
174
-
175
-
176
-
177
-
178
-
179
-
180
-
181
-
182
-
183
-
184
-
185
-
186
-
187
 |
 |