Toshiba Satellite Pro M300 User Guide - Page 56
Removing a memory module, Press Any Key to Continue
 |
View all Toshiba Satellite Pro M300 manuals
Add to My Manuals
Save this manual to your list of manuals |
Page 56 highlights
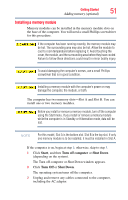
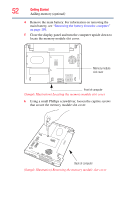
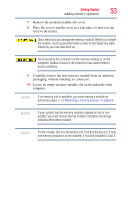
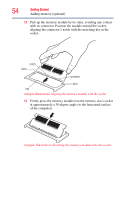
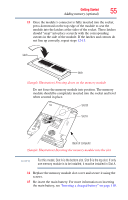
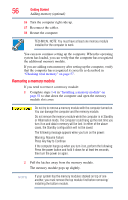
56 Getting Started Adding memory (optional) 16 Turn the computer right side up. 17 Reconnect the cables. 18 Restart the computer. TECHNICAL NOTE: You must have at least one memory module installed for the computer to work. You can now continue setting up the computer. When the operating system has loaded, you can verify that the computer has recognized the additional memory module. If you are adding extra memory after setting up the computer, verify that the computer has recognized it correctly as described in "Checking total memory" on page 57. Removing a memory module If you need to remove a memory module: 1 Complete steps 1-8 in "Installing a memory module" on page 51 to shut down the computer and open the memory module slot cover. Do not try to remove a memory module with the computer turned on. You can damage the computer and the memory module. Do not remove the memory module while the computer is in Standby or Hibernation mode. The computer could hang up the next time you turn it on and data in memory will be lost. In either of the above cases, the Standby configuration will not be saved. The following message appears when you turn on the power: Warning: Resume Failure Press Any Key to Continue If the computer hangs up when you turn it on, perform the following: Press the power button and hold it down for at least ten seconds, then turn the power on again. 2 Pull the latches away from the memory module. The memory module pops up slightly. NOTE If your system has the memory modules stacked on top of one another, you must remove the top module first before removing/ installing the bottom module.
-
 1
1 -
2
-
3
-
4
-
5
-
6
-
7
-
8
-
9
-
10
-
11
-
12
-
13
-
14
-
15
-
16
-
17
-
18
-
19
-
20
-
21
-
22
-
23
-
24
-
25
-
26
-
27
-
28
-
29
-
30
-
31
-
32
-
33
-
34
-
35
-
36
-
37
-
38
-
39
-
40
-
41
-
42
-
43
-
44
-
45
-
46
-
47
-
48
-
49
-
50
-
 51
51 -
 52
52 -
 53
53 -
 54
54 -
 55
55 -
 56
56 -
 57
57 -
 58
58 -
 59
59 -
 60
60 -
 61
61 -
62
-
63
-
64
-
65
-
66
-
67
-
68
-
69
-
70
-
71
-
72
-
73
-
74
-
75
-
76
-
77
-
78
-
79
-
80
-
81
-
82
-
83
-
84
-
85
-
86
-
87
-
88
-
89
-
90
-
91
-
92
-
93
-
94
-
95
-
96
-
97
-
98
-
99
-
100
-
101
-
102
-
103
-
104
-
105
-
106
-
107
-
108
-
109
-
110
-
111
-
112
-
113
-
114
-
115
-
116
-
117
-
118
-
119
-
120
-
121
-
122
-
123
-
124
-
125
-
126
-
127
-
128
-
129
-
130
-
131
-
132
-
133
-
134
-
135
-
136
-
137
-
138
-
139
-
140
-
141
-
142
-
143
-
144
-
145
-
146
-
147
-
148
-
149
-
150
-
151
-
152
-
153
-
154
-
155
-
156
-
157
-
158
-
159
-
160
-
161
-
162
-
163
-
164
-
165
-
166
-
167
-
168
-
169
-
170
-
171
-
172
-
173
-
174
-
175
-
176
-
177
-
178
-
179
-
180
-
181
-
182
-
183
-
184
-
185
-
186
-
187
-
188
-
189
-
190
-
191
-
192
-
193
-
194
-
195
-
196
-
197
-
198
-
199
-
200
-
201
-
202
-
203
-
204
-
205
-
206
-
207
-
208
-
209
-
210
-
211
-
212
-
213
-
214
-
215
-
216
-
217
-
218
-
219
-
220
-
221
-
222
-
223
-
224
-
225
-
226
-
227
-
228
-
229
-
230
-
231
-
232
-
233
-
234
-
235
-
236
-
237
-
238
-
239
 |
 |
