Tripp Lite SMART1500LCDT Owner's Manual for LCDT-Series UPS Systems 93327C - Page 3
Quick Installation - battery
 |
View all Tripp Lite SMART1500LCDT manuals
Add to My Manuals
Save this manual to your list of manuals |
Page 3 highlights
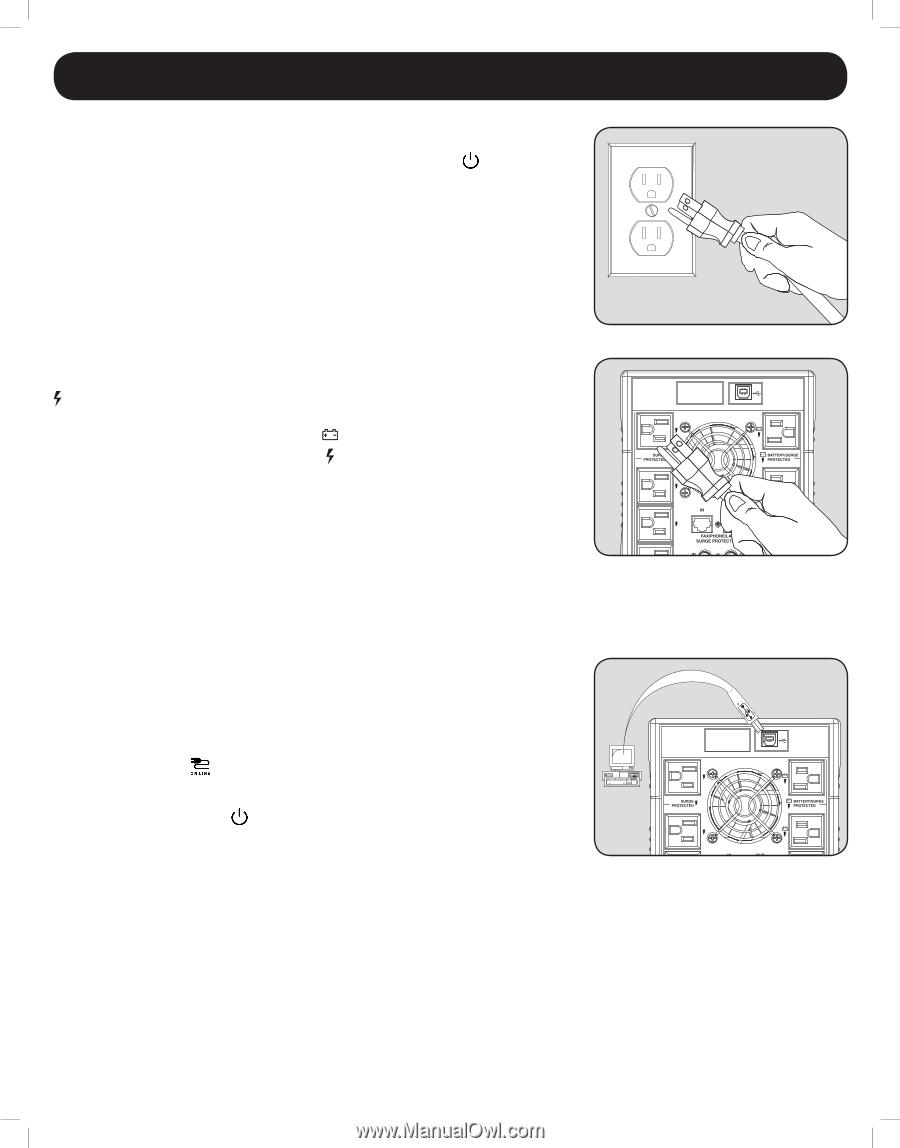
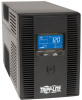
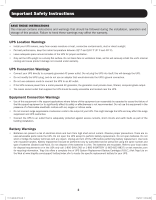
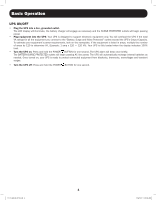
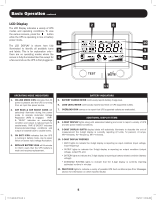
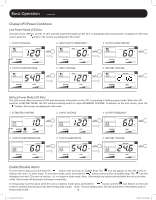
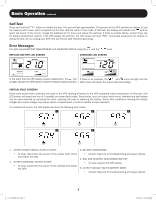
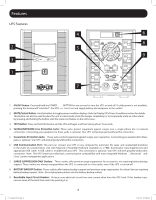
Quick Installation STEP 1: Plug the UPS into a properly grounded outlet. After plugging the UPS into a wall outlet, press and hold the POWER BUTTON for one second to turn on the UPS (See Basic Operation Section). Note: The UPS will not turn on automatically in the presence of live utility power. STEP 2: Plug your equipment into the UPS. There are two sets of outlets on the back of your UPS. Outlets marked SURGE PROTECTED do not provide battery backup power during power outages. Connect common desktop items like printers, scanners and other accessories not requiring battery support to these outlets. Outlets marked BATTERY/SURGE PROTECTED offer UPS battery backup support during power failures. Connect your vital computer equipment into these outlets. Your UPS is designed to support electronic equipment only. You will overload the UPS if the total VA ratings for all the equipment connected to the BATTERY/SURGE PROTECTED outlets exceed the UPS output capacity. To find your equipment's VA ratings, look on their nameplates. If the equipment is listed in amps, multiply the number of amps by 120 to determine VA. For example: 1 amp × 120 = 120 VA. If you suspect you have overloaded the outlets, check the Load Percentage and Load Meter screens (See Display UPS/Power Conditions descriptions in Basic Operation Section). If you are still unsure, run a self-test (See Self-Test description in Basic Operation Section). Optional Installation All models include USB communication ports, tel/DSL/Ethernet (Not compatible with PoE applications) surge protection jacks and coaxial line protection jacks. These connections are optional; the UPS will work properly without these connections. See the connector's description in the Basic Operation section for connection instructions. If the LINE POWER icon does not illuminate when the UPS is turned ON, try the following: 1. Make sure that the UPS is plugged into a live AC outlet. 2. Press and hold the POWER BUTTON for one second to turn on the UPS. A beep should sound when the UPS starts. 3. If the UPS still does not start, contact Tripp Lite Tech Support for assistance. 3 12-12-069-93-327C.indb 3 12/6/2012 9:28:35 AM
-
 1
1 -
 2
2 -
 3
3 -
 4
4 -
 5
5 -
 6
6 -
 7
7 -
 8
8 -
 9
9 -
10
-
11
-
12
-
13
-
14
-
15
-
16
-
17
-
18
-
19
-
20
-
21
-
22
-
23
-
24
-
25
-
26
-
27
-
28
-
29
-
30
-
31
-
32
-
33
-
34
-
35
-
36
 |
 |