Tripp Lite SU3000RTXL3UHV Owner's Manual for SmartOnline UPS 932609 - Page 3
Installation
 |
View all Tripp Lite SU3000RTXL3UHV manuals
Add to My Manuals
Save this manual to your list of manuals |
Page 3 highlights
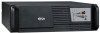
200608121 93-2609 SU Owner's Manual.qxd 10/3/2006 3:32 PM Page 3 Installation Mounting Rackmount 1) Loosen the wingnuts on each of the two UPS Side Supports; adjust the length of the supports to match the depth of your rack; tighten wingnuts. 2) Mount both UPS Side Supports in your rack on the inside surfaces of the rack rails. Note: Both support ledges should face inward. The side supports' front and back holes are threaded and do not require nuts to secure rack bolts. 3) Attach mounting 'ears' to the front end of the UPS's sides using the screws provided. 4) Lift UPS and slide it onto the UPS Side Supports within your rack. Mount the UPS by screwing rack bolts through the UPS mounting 'ears', through the rack rails and through the UPS Side Supports. Note: The side supports' front holes are threaded and do not require nuts to secure rack bolts. Vertical Tower Mount 1) Cover the rackmount screw holes on the UPS's sides with supplied snap-in hole-cover caps. 2) Place the UPS upright in a flat, stable location with its control panel on the high corner facing forward. Position stabilizer feet 4 in. from each end of the UPS. SU2200RTXL2U shown SU2200RTXL2U shown 3
-
 1
1 -
 2
2 -
 3
3 -
 4
4 -
 5
5 -
 6
6 -
 7
7 -
 8
8 -
 9
9 -
10
-
11
-
12
-
13
-
14
-
15
-
16
-
17
-
18
-
19
-
20
-
21
-
22
-
23
-
24
-
25
-
26
-
27
-
28
-
29
-
30
-
31
-
32
-
33
-
34
-
35
-
36
-
37
-
38
-
39
-
40
-
41
-
42
-
43
-
44
-
45
-
46
-
47
-
48
-
49
-
50
-
51
-
52
-
53
-
54
-
55
-
56
-
57
-
58
-
59
-
60
 |
 |
