Troy-Bilt Squall 2100 Operation Manual - Page 12
Starting & Stopping the Engine, Engaging the Auger, Engaging the Drive, Adjusting the Chute, - snow thrower parts
 |
View all Troy-Bilt Squall 2100 manuals
Add to My Manuals
Save this manual to your list of manuals |
Page 12 highlights
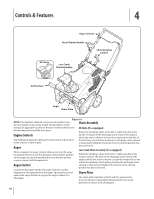
Operation 5 Starting & Stopping the Engine WARNING! Always keep hands and feet clear of moving parts. Do not use a pressurized starting fluid. Vapors are flammable. Low-Crank Chute Assembly (If so equipped) 1. Rotate the discharge chute to the left or right using the chute rotation control. See Fig. 5-2. Refer to the Engine Operator's manual packed with your snow thrower for instructions on starting and stopping the engine. Engaging the Auger To engage the auger and start throwing snow, squeeze the auger control against the handle. Release to stop the auger. Engaging the Drive Lift up slightly on the handle to allow the rubber paddles on the auger to contact the pavement and propel the snow thrower forward. Pushing downward on the handle will raise the auger off the ground and stop the forward motion. NOTE: Excessive upward pressure on the handle will result in premature wear on the rubber auger blades which are not be covered by the warranty. Adjusting the Chute EZ Chute (If so equipped) 1. Rotate the discharge chute to the left or right using the chute handle. See Fig. 5-1. Chute Handle Discharge Chute Wing Knob Chute Control Handle Discharge Chute Wing Knob Figure 5-2 2. To adjust the pitch, loosen the wing knob on the side of the discharge chute and pivot the discharge chute upward or downward. Retighten the knob once the desired position has been achieved. See Fig. 5-2. Clearing a Clogged Discharge Chute WARNING! Never use your hands to clear a clogged chute assembly. Shut off engine and remain behind handles until all moving parts have stopped before using a clean-out tool to clear the chute assembly. Hand contact with the rotating impeller inside the discharge chute is the most common cause of injury associated with snow throwers. Never use your hand to clean out the discharge chute. To clear the chute: 1. SHUT THE ENGINE OFF! 2. Wait 10 seconds to be sure the impeller blades have stopped rotating. 3. Always use a clean-out tool, not your hands. Figure 5-1 2. To adjust the pitch, loosen the wing knob on the side of the discharge chute and pivot the discharge chute upward or downward. Retighten the knob once the desired position has been achieved. See Fig. 5-1. 12
-
 1
1 -
2
-
3
-
4
-
5
-
6
-
 7
7 -
 8
8 -
 9
9 -
 10
10 -
 11
11 -
 12
12 -
 13
13 -
 14
14 -
 15
15 -
 16
16 -
 17
17 -
18
-
19
-
20
-
21
-
22
-
23
-
24
-
25
-
26
-
27
-
28
-
29
-
30
-
31
-
32
-
33
-
34
-
35
-
36
-
37
-
38
-
39
-
40
 |
 |
