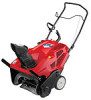
Troy-Bilt Squall 2100 Operation Manual - Page 15
Service - belt
 |
View all Troy-Bilt Squall 2100 manuals
Add to My Manuals
Save this manual to your list of manuals |
Page 15 highlights
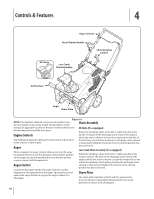
Service 7 Replacing Belt 1. Run the snow thrower until the fuel tank is empty. 2. Pull the recoil starter handle until resistance is felt. Then tip the snow thrower back until it rests on the handles. 3. Slide a board up through the auger and through the chute to secure the auger in place. 4. Remove the belt cover by removing the two hex washer screws and one hex lock screw that secure it to the frame. See Fig. 7-1. To replace the belt follow these instructions and refer to Fig. 7-3: Drive Pulley Idler Pulley Hex Lock Screw Belt Keeper Flange Nut Auger Pulley Figure 7-3 1. Route the belt around the drive pulley and under the idler pulley. Hex Washer Screw 2. Route the end of the belt around the auger pulley and slide the pulley back on to the auger shaft. It may be necessary to push down on the idler pulley to get the auger pulley under the belt keeper. 3. Replace the flange nut and tighten securely. Figure 7-1 4. Reinstall the belt cover removed earlier. 5. Remove the flange nut that secures the auger pulley to the 5. Remove the board from the auger and chute. auger shaft. See Fig. 7-2. Auger Shaft Auger Pulley Figure 7-2 6. Remove the auger pulley and the belt. Flange Nut 15
-
 1
1 -
2
-
3
-
4
-
5
-
6
-
7
-
8
-
9
-
 10
10 -
 11
11 -
 12
12 -
 13
13 -
 14
14 -
 15
15 -
 16
16 -
 17
17 -
 18
18 -
 19
19 -
 20
20 -
21
-
22
-
23
-
24
-
25
-
26
-
27
-
28
-
29
-
30
-
31
-
32
-
33
-
34
-
35
-
36
-
37
-
38
-
39
-
40
 |
 |
