URC URC-RF30 Owners Manual - Page 12
Customizing the LCD Touch Screen
 |
View all URC URC-RF30 manuals
Add to My Manuals
Save this manual to your list of manuals |
Page 12 highlights
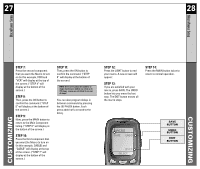
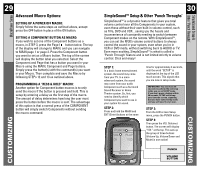
21 22 Customizing the LCD Touch Screen Customizing the LCD Touch Screen STEP 5: Press the button you wish to edit. The first character space of your button label will start to blink. UP CURSOR Button deletes all text LEFT CURSOR Moves blinking character left DOWN CURSOR deletes the currently blinking character RIGHT CURSOR Moves blinking character right BLINKING CHARACTER STEP 6: Change the character by using any of the number keys. Each press of the same number button selects the next character of that number's group, as shown in the diagram below. STEP 7: Once the character you want appears, move to the next space by pressing the Right cursor button. STEP 8: When you are finished editing the button, press the button you edited and "SAVED" will flash at the bottom of the display. To change any other button labels on the same Component, press the next button, then repeat steps 6-8. If you wish to edit a button on another Component, press the MAIN button once, then repeat Steps 4-8. STEP 9: Once you've finished editing buttons, press the MAIN button four times to return to normal operation. CUSTOMIZING CUSTOMIZING
-
 1
1 -
2
-
3
-
4
-
5
-
6
-
 7
7 -
 8
8 -
 9
9 -
 10
10 -
 11
11 -
 12
12 -
 13
13 -
 14
14 -
 15
15 -
 16
16 -
 17
17 -
18
-
19
-
20
-
21
-
22
-
23
-
24
-
25
-
26
-
27
-
28
-
29
-
30
-
31
-
32
-
33
-
34
-
35
 |
 |
