URC URC-RF30 Owners Manual - Page 15
MacroPower Setup
 |
View all URC URC-RF30 manuals
Add to My Manuals
Save this manual to your list of manuals |
Page 15 highlights
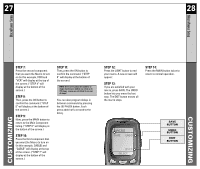
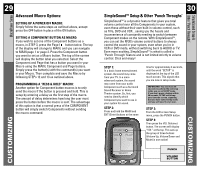
27 28 MacroPower Setup MacroPower Setup STEP 7: Press the second component that you want the Macro to turn on (in this example, VCR) and "VCR" will display at the top of the screen. ("STEP 4" will display at the bottom of the screen.) STEP 8: Then, press the ON button to confirm the command. ("STEP 5" will display at the bottom of the screen.) STEP 9: Now, press the MAIN button to return to the Main Component listing. ("STEP 6" will display at the bottom of the screen.) STEP 10: Press the third component that you want the Macro to turn on (in this example, CABLE) and "CABLE" will display at the top of the screen. ("STEP 7" will display at the bottom of the screen.) STEP 11: Then, press the ON button to confirm the command. ("STEP 8" will display at the bottom of the screen.) NOTE: Don't worry about the number of steps. Each macro button can store up to 190 steps, so you are not likely to run out of steps! You can also program delays in between commands by pressing the (II) PAUSE button. Each press adds half a second to the delay. STEP 12: Press the LIGHT button to end your macro. A new screen will appear: STEP 13: If you are satisfied with your macro, press SAVE. The UNDO button lets you erase the last step. The EXIT button erases all the macro steps. STEP 14: Press the MAIN button twice to return to normal operation. SAVE BUTTON UNDO BUTTON EXIT BUTTON CUSTOMIZING CUSTOMIZING
-
 1
1 -
2
-
3
-
4
-
5
-
6
-
7
-
8
-
9
-
 10
10 -
 11
11 -
 12
12 -
 13
13 -
 14
14 -
 15
15 -
 16
16 -
 17
17 -
 18
18 -
 19
19 -
 20
20 -
21
-
22
-
23
-
24
-
25
-
26
-
27
-
28
-
29
-
30
-
31
-
32
-
33
-
34
-
35
 |
 |
