Uniden UDW155 English Owner's Manual - Page 14
Multiple Camera Features - add on camera
 |
View all Uniden UDW155 manuals
Add to My Manuals
Save this manual to your list of manuals |
Page 14 highlights
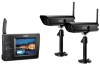
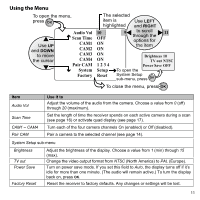
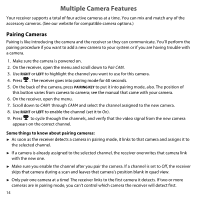
Multiple Camera Features Your receiver supports a total of four active cameras at a time. You can mix and match any of the accessory cameras. (See our website for compatible camera options.) Pairing Cameras Pairing is like introducing the camera and the receiver so they can communicate. You'll perform the pairing procedure if you want to add a new camera to your system or if you are having trouble with a camera. 1. Make sure the camera is powered on. 2. On the receiver, open the menu and scroll down to Pair CAM. 3. Use Right or Left to highlight the channel you want to use for this camera. 4. Press . The receiver goes into pairing mode for 60 seconds. 5. On the back of the camera, press Pairing Key to put it into pairing mode, also. The position of this button varies from camera to camera; see the manual that came with your camera. 6. On the receiver, open the menu. 7. Scroll down to CAM1 through CAM4 and select the channel assigned to the new camera. 8. Use Right or Left to enable the channel (set it to On). 9. Press to cycle through the channels, and verify that the video signal from the new camera appears on the correct channel. Some things to know about pairing cameras: ►► As soon as the receiver detects a camera in pairing mode, it links to that camera and assigns it to the selected channel. ►► If a camera is already assigned to the selected channel, the receiver overwrites that camera link with the new one. ►► Make sure you enable the channel after you pair the camera. If a channel is set to Off, the receiver skips that camera during a scan and leaves that camera's position blank in quad view. ►► Only pair one camera at a time! The receiver links to the first camera it detects. If two or more cameras are in pairing mode, you can't control which camera the receiver will detect first. 14
-
 1
1 -
2
-
3
-
4
-
5
-
6
-
7
-
8
-
 9
9 -
 10
10 -
 11
11 -
 12
12 -
 13
13 -
 14
14 -
 15
15 -
 16
16 -
 17
17 -
 18
18 -
 19
19 -
20
-
21
-
22
-
23
-
24
-
25
-
26
 |
 |