ViewSonic PJD5255L PJD5350LS User Guide English - Page 21
Connection
 |
View all ViewSonic PJD5255L manuals
Add to My Manuals
Save this manual to your list of manuals |
Page 21 highlights
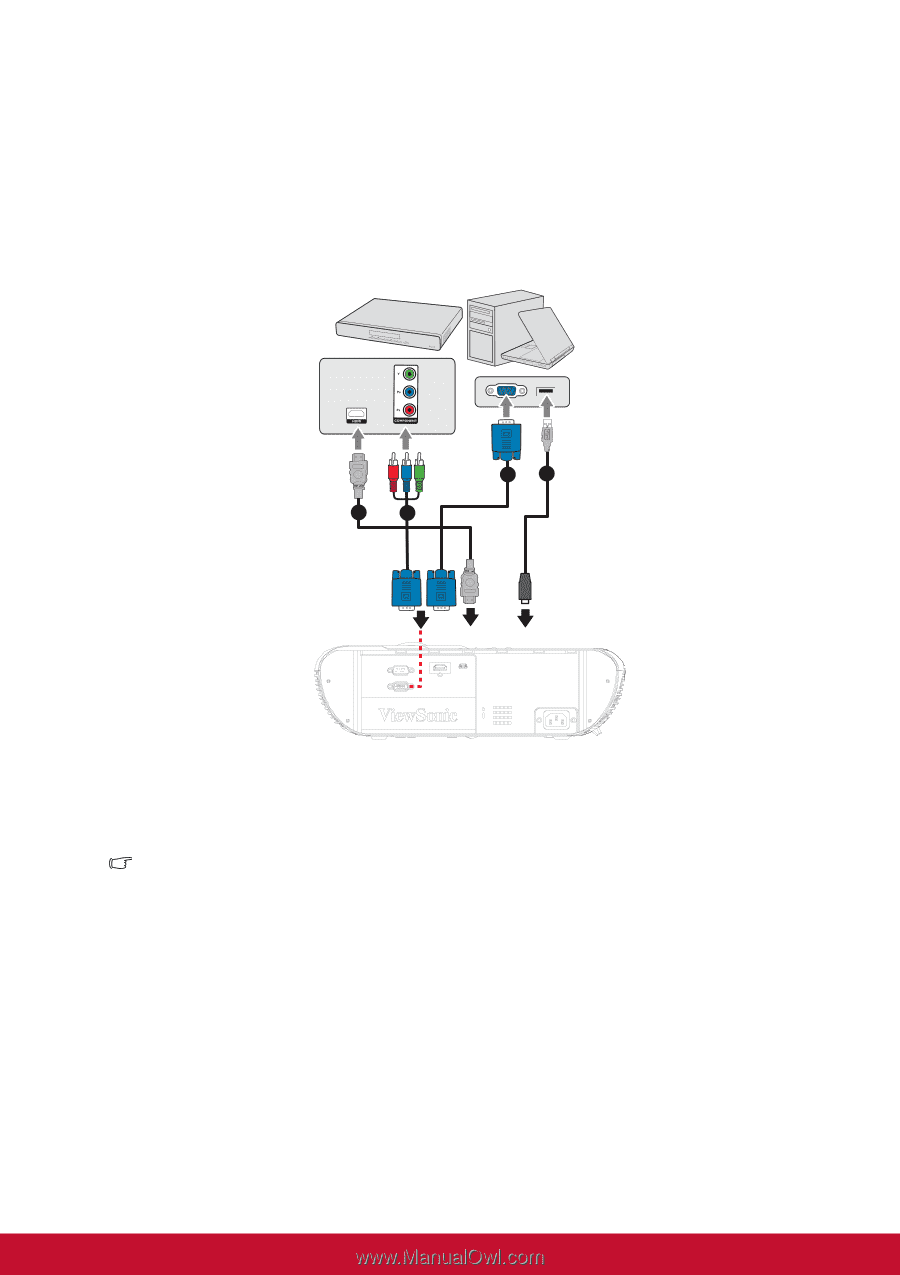
Connection When connecting a signal source to the projector, be sure to: 1. Turn all equipment off before making any connections. 2. Use the correct signal cables for each source. 3. Ensure the cables are firmly inserted. 1 2 34 RS-232 COMPUTER IN HDMI MINI USB 1. HDMI cable 3. VGA to DVI-A cable 2. VGA (D-Sub) to HDTV (RCA) cable 4. USB cable Important • In the connections shown above, some cables may not be included with the projector (see "Package contents" on page 2). They are commercially available from electronics stores. • The connection illustrations above are for reference only. The rear connecting jacks available on the projector vary with each projector model. • For detailed connection methods, see pages 14-16. 13
-
 1
1 -
2
-
3
-
4
-
5
-
6
-
7
-
8
-
9
-
10
-
11
-
12
-
13
-
14
-
15
-
 16
16 -
 17
17 -
 18
18 -
 19
19 -
 20
20 -
 21
21 -
 22
22 -
 23
23 -
 24
24 -
 25
25 -
 26
26 -
27
-
28
-
29
-
30
-
31
-
32
-
33
-
34
-
35
-
36
-
37
-
38
-
39
-
40
-
41
-
42
-
43
-
44
-
45
-
46
-
47
-
48
-
49
-
50
-
51
-
52
-
53
-
54
-
55
-
56
-
57
-
58
-
59
-
60
-
61
-
62
-
63
-
64
-
65
-
66
-
67
-
68
-
69
-
70
-
71
-
72
 |
 |
13
Connection
When connecting a signal source to the projector, be sure to:
1.
Turn all equipment off before making any connections.
2.
Use the correct signal cables for each source.
3.
Ensure the cables are firmly inserted.
Important
•
In the connections shown above, some cables may not be included with the projector
(see
"Package contents" on page 2
). They are commercially available from electronics
stores.
•
The connection illustrations above are for reference only. The rear connecting jacks
available on the projector vary with each projector model.
•
For detailed connection methods, see pages
14-16
.
1. HDMI cable
2.
VGA (D-Sub) to HDTV (RCA) cable
3.
VGA to DVI-A cable
4.
USB cable
1
2
3
4
HDMI
MINI
USB
RS-232
COMPUTER IN