ViewSonic PM-FCP Instruction Manual - Page 11
Technical Specifications
 |
View all ViewSonic PM-FCP manuals
Add to My Manuals
Save this manual to your list of manuals |
Page 11 highlights
PM-FCP Securing Pipe to the PM-FCP Step 1. Secure the 1½" (NPT) pipe to the ceiling plate and tighten by using one (1) M5 x 16 Phillips head screw (supplied) to the plate. The M5 x 16 Phillip head screw must be used to stabilize the 1½" (NPT) pipe. M5 x 16mm Screw 1-1/2" Pipe Opening PM-FCP Technical Specifications All measurements are in inches (mm). Installation Instructions Page 11
-
 1
1 -
2
-
3
-
4
-
5
-
 6
6 -
 7
7 -
 8
8 -
 9
9 -
 10
10 -
 11
11 -
 12
12
 |
 |

PM-FCP
Installation Instructions
Page 11
Technical Specifications
All measurements are in inches (mm).
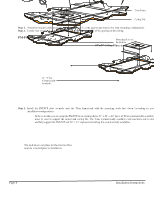
Securing Pipe to the PM-FCP
Step 1.
Secure the 1½” (NPT) pipe to the ceiling plate and tighten by using one (1) M5 x 16 Phillips head screw (supplied)
to the plate.
The M5 x 16 Phillip head screw must be used to stabilize the 1½” (NPT) pipe.
M5 x 16mm
Screw
1-1/2” Pipe
Opening
PM-FCP