Viking DFWB300R Installation Instructions - Page 13
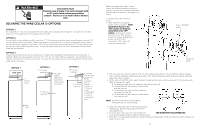
Securing The Wine Cellar 3 Options
 |
View all Viking DFWB300R manuals
Add to My Manuals
Save this manual to your list of manuals |
Page 13 highlights
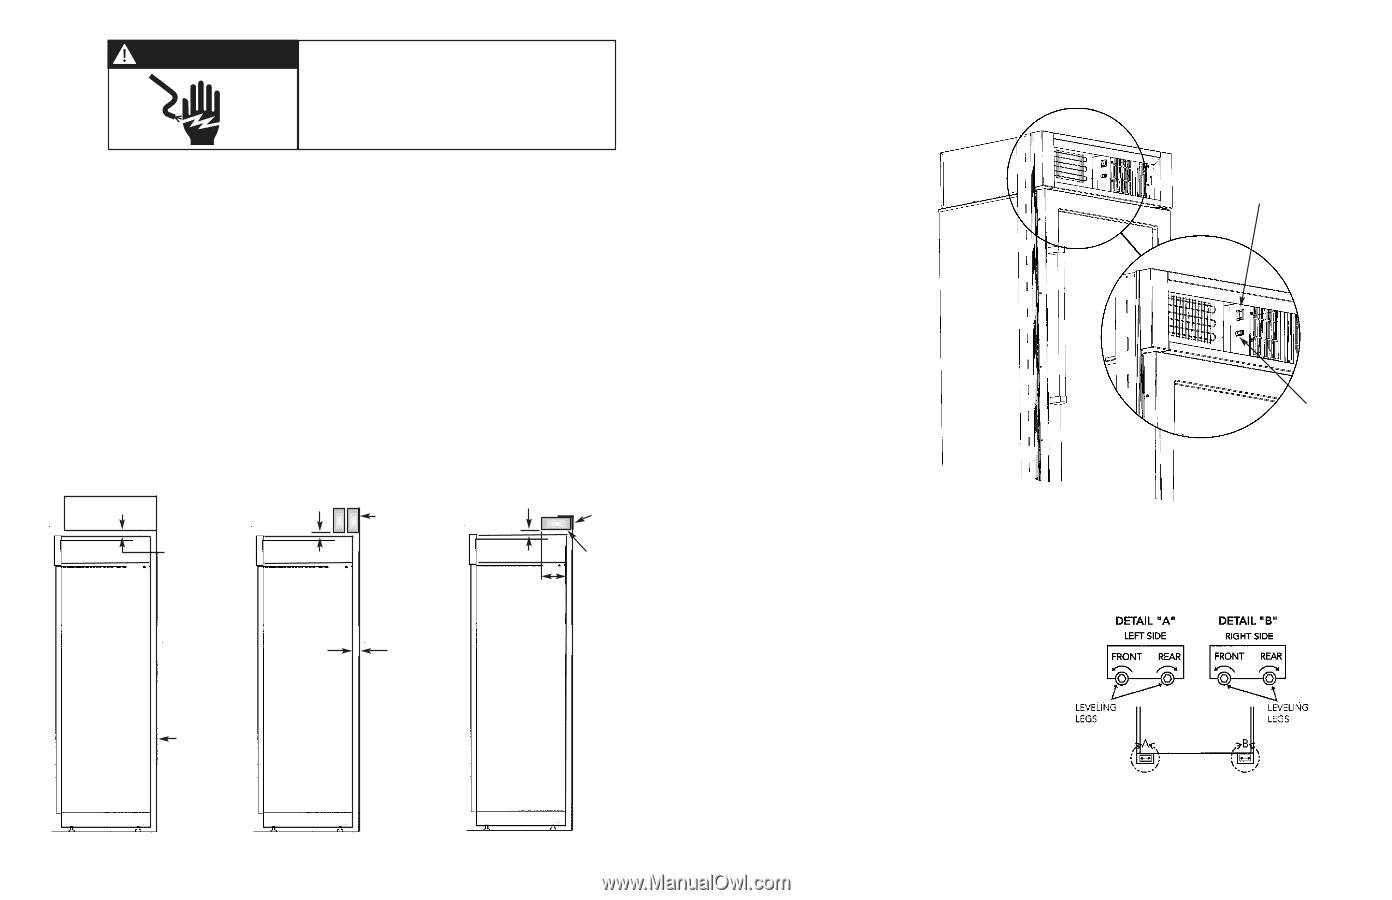
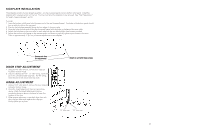
WARNING Electrical Shock Hazard Disconnect power at breaker or turn power disconnect switch to OFF position before performing any installation procedure. Failure to do so can result in death or electrical shock. SECURING THE WINE CELLAR (3 OPTIONS) OPTION 1 If a solid soffit is 1" (2.5 cm) or less above the wine cellar, anti-tip boards are not required. To secure the wine cellar raise unit until compartment is firmly seated under the soffit. OPTION 2 If a solid soffit is not available or soffit is more than 1" (2.5 cm) above wine cellar, center wood boards on rear wall 1/4" (.6 cm) maximum above wine cellar. Attach wood boards to wall studs with six of the provided wood screws, making sure that screws are engaged in wall studs 1 1/2" (3.8 cm) minimum and that boards extend 2" (5.0 cm) minimum over the top rear of wine cellar compressor cover. To secure the wine cellar, raise unit until compartment is firmly seated under the anti-tip board. OPTION 3 Position the wood block over the unit and secure it to wall studs using eight of the provided wood screws and "L" brackets. Make sure screws extend a minimum of 1" (2.5 cm) into each of the two wall studs. The wood block must extend a minimum of 3" (7.6 cm) over the unit. To secure the wine cellar, raise unit until compartment is firmly seated under the anti-tip boards. OPTION 1 Solid Soffit 1" (2.5 cm) or less OPTION 2 1/4" (.6 cm) maximum Two 2X4 boards attached to wall with six wood screws (minimum) 2" (5.0 cm) minimum OPTION 3 1/4" (.6 cm) maximum 3" (7.6 cm) minimum "L" bracket with (4) screws on each end. (1) 2X4 attached to both "L" brackets minimum of 1" (2.5 cm) screws Screws extend minimum of 1" (2.5 cm) into each wall stud. Rear wall 24 Before moving the wine cellar in place, confirm the finished dimensions, electrical location, minimum door and shelf clearances, and door panel instructions. (See pages 3, 4, 5 & 6). 1. Position wine cellar in front of cutout. 2. Verify operation by plugging power cord in receptacle. Power switch will be shipped in the "ON" position and showroom switch will be in the "OFF" position. (If showroom switch is switched to the "ON" position, showroom mode is engaged and power is shut-off to the compressor. This mode is for showroom display only). Power "ON/OFF" switch Showroom switch 3. Roll wine cellar into cutout to within 3" (7.6 cm) of being flush with cabinets. To avoid kitchen cabinet damage, place cardboard between cabinets and wine cellar. Push cardboard back with wine cellar and remove cardboard when wine cellar is in place. 4. Lift the wine cellar off the rollers, adjust to desired height and level wine cellar by using a 5/16" hex head wrench. (Refer to Figure at the right) a) To raise/lower right side rear, rotate the right side rear hex rod. b) To raise/lower the left side rear, rotate the left side rear hex rod. c) To raise/lower the right side front, rotate the right side front hex rod. d) To raise/lower the left side front, rotate the left side front hex rod. NOTE: DO NOT use an electric driving device. Overtightening can cause damage. 5. Align wine cellar with sides of cabinets by adjusting leveling legs. Rotate leveling legs until firmly in place against floor. 6. To secure wine cellar, raise unit until compartment VIEW SHOWN WITH KICKPLATE REMOVED cover is firmly seated under the soffit or anti-tip boards. 7. Open door. Control panel should be lit. Verify the position of the power on/off and showroom switch if there is no power to wine cellar. 25
-
 1
1 -
2
-
3
-
4
-
5
-
6
-
7
-
 8
8 -
 9
9 -
 10
10 -
 11
11 -
 12
12 -
 13
13 -
 14
14
 |
 |