Viking FDSB5483 Installation Instructions - Page 25
Installation
 |
View all Viking FDSB5483 manuals
Add to My Manuals
Save this manual to your list of manuals |
Page 25 highlights
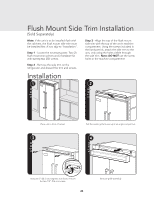
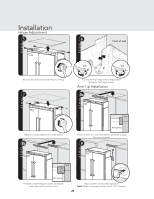
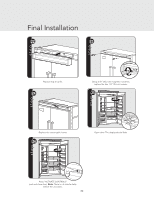
HInestaadllaintieon Hinge Adjustment 5 2 1 Remove four side screws and remove unit top. 7 1 2 Replace unit top. Replace four side screws. 8b 6 Front of unit 2 1 3 Loosen the four hinge screws. Adjust door. Retighten four hinge screws. Anti-Tip Installation 8a Wall 2 x 4 Refrigerator Attach one 2 x 4 to wall stud (refer to dimensions page for exact location). 9 Wall 2 x 4 Refrigerator If needed, depending on cabinet and depth, attach second 2 x 4 to first 2 x 4. Plug in power cord to verify operation. Note: Make sure power switch is in the "On" Position. 25
-
 1
1 -
2
-
3
-
4
-
5
-
6
-
7
-
8
-
9
-
10
-
11
-
12
-
13
-
14
-
15
-
16
-
17
-
18
-
19
-
 20
20 -
 21
21 -
 22
22 -
 23
23 -
 24
24 -
 25
25 -
 26
26 -
 27
27 -
 28
28 -
 29
29 -
 30
30 -
31
-
32
-
33
-
34
-
35
-
36
 |
 |

25
25
1
2
7
8a
Wall
2 x 4
Refrigerator
Front of unit
2
1
3
6
Replace unit top. Replace four side screws.
Attach one 2 x 4 to wall stud (
refer to dimensions page
for exact location
).
Loosen the four hinge screws. Adjust door.
Retighten four hinge screws.
2
1
5
Remove four side screws and remove unit top.
8b
Wall
2 x 4
Refrigerator
9
If needed, depending on cabinet and depth,
attach second 2 x 4 to first 2 x 4.
Plug in power cord to verify operation.
Note:
Make sure power switch is in the “On” Position.
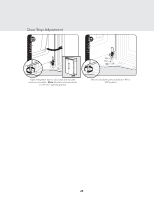
Hinge Adjustment
Anti-Tip Installation
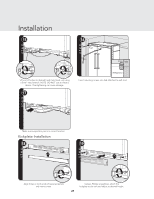
Installation