Viking MVBI7360W Installation Instructions - Page 18
Flush Mount Side Trim
 |
View all Viking MVBI7360W manuals
Add to My Manuals
Save this manual to your list of manuals |
Page 18 highlights
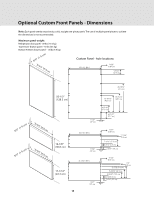
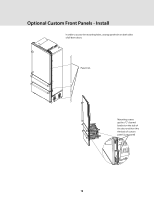
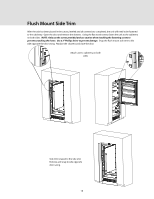
Flush Mount Side Trim After the unit has been placed in the cutout, leveled and all connections completed, the unit will need to be fastened to the cabinetry. Open the door and remove the drawers. Using the flat wood screws, fasten the unit to the cabinetry on both sides. NOTE: Only use the screws provided and use caution when installing the fastening screws to prevent scratching the frame. Use a 3" Phillips driver to prevent damage. Snap the flush mount side trim to the side opposite the door swing. Replace the drawers and close the door. Attach unit to cabinetry on both sides Side trim is taped to the side unit. Remove and snap to side opposite door swing. 18
-
 1
1 -
2
-
3
-
4
-
5
-
6
-
7
-
8
-
9
-
10
-
11
-
12
-
 13
13 -
 14
14 -
 15
15 -
 16
16 -
 17
17 -
 18
18 -
 19
19 -
 20
20 -
 21
21 -
 22
22 -
 23
23 -
24
 |
 |

18
Flush Mount Side Trim
After the unit has been placed in the cutout, leveled and all connections completed, the unit will need to be fastened
to the cabinetry.
Open the door and remove the drawers.
Using the flat wood screws, fasten the unit to the cabinetry
on both sides.
NOTE:
Only use the screws provided and use caution when installing the fastening screws to
prevent scratching the frame.
Use a 3" Phillips driver to prevent damage.
Snap the flush mount side trim to the
side opposite the door swing.
Replace the
drawers and close the door.
Attach unit to cabinetry on both
sides
Side trim is taped to the side unit.
Remove and snap to side opposite
door swing.