Viking QSC200SS Installation Instructions - Page 6
Lp/propane Tank Connection, Lp/propane Tank Requirements, Lp/propane Fixed Piping Connection - parts
 |
View all Viking QSC200SS manuals
Add to My Manuals
Save this manual to your list of manuals |
Page 6 highlights
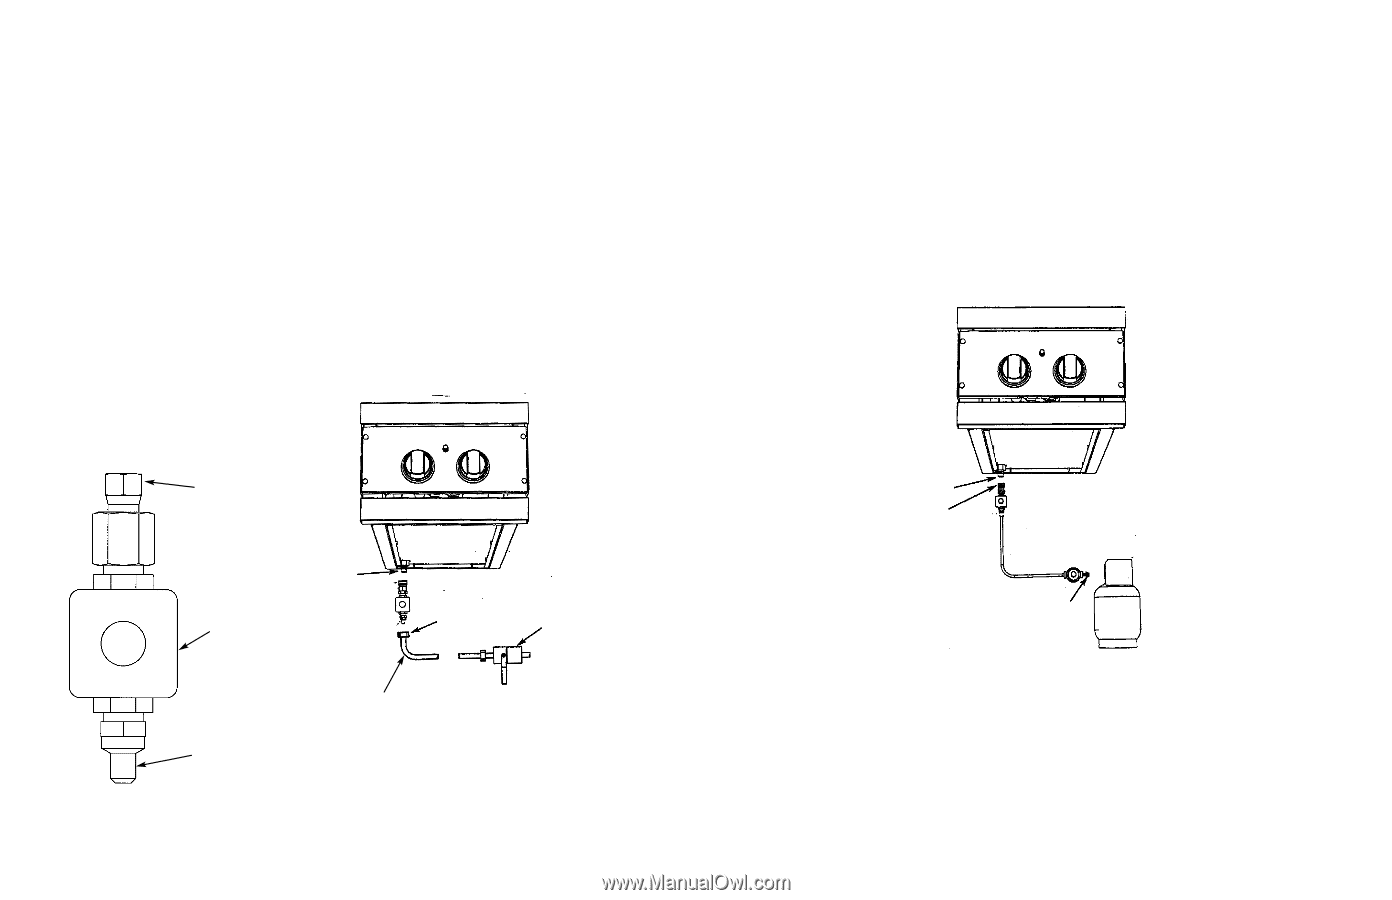
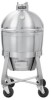
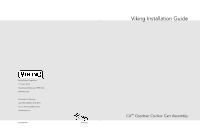
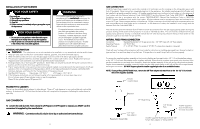
LP/PROPANE FIXED PIPING CONNECTION Connection: Operating Pressure: Supply Pressure: Standard Residential 1/2" ID gas service line - 1/2" NPT male with 3/8" flare adapter. 10.0" W.C.P. Nat. 11" to 14" W.C.P. Nat. If in excess of 14" W.C.P., a step-down regulator is required. Check with your local gas utility company or with local codes for instructions on installing gas supply lines. Be sure to check on type and size of run and how deep to bury the lines. If the gas line is too small, the grill will not function properly. To connect the supplied regulator assembly to the incoming flexible gas line, attach with a 3/8" female flare adaptor to the 3/8" male flare adaptor to the regulator assembly. Ensure that the regulator arrow points in the direction of the gas flow towards the unit and away from the supply. Attach the regulator assembly to the grill unit with the 3/8" female flare adapter on the regulator assembly to the 3/8" male flare adaptor on the grill. DO NOT forget to place the installer supplied gas valve in an accessible location. LP/PROPANE TANK CONNECTION Side Burners orificed for use with LP/Propane gas come equipped with a high capacity hose/regulator assembly for connection to a standard 20 lb. LP/Propane cylinder equipped with a Type 1, QCC-1 connector. (See LP/Propane tank requirements on page 6). Connection: 1/2" (1.3 cm) NPT male with a 1/2" (1.3) flare adapter Operating Pressure: 10.0" W.C.P. To connect to LP/Propane regulator/hose assembly: Although the flow of gas is stopped when the quick disconnect system is disconnected as part of its safety feature, you should always turn the LP/Propane tank main valve "OFF" after each use and during transport of the tank or unit. First connect the regulator to the unit by screwing the 1/2" flare coupling onto the 1/2" flare adapter. Connect to the tank valve by screwing the Type 1, QCC-1 connector to the LP/Propane tank. Open the tank valve and check the connection between the regulator and the Type 1, QCC-1 fitting for leaks with a soapy water solution. If bubbles appear, tighten the connection. Repeat until all leaks have been stopped.ALWAYS CHECK FOR LEAKS AFTER EVERY LP/PROPANE TANK CHANGE Any joint sealant used must be an approved type and be resistive to the actions of LP/Propane gas 3/8" female flare adaptor 1/2" Male fitting Regulator 1/2" female flare Installer supplied shut-off valve must be easily accessible 3/8" male flare adaptor Regulator Assembly Installer supplied flexible gas line with 1/2" female flare adaptor or Viking GSH12 10 1/2" flare adapter 1/2" flare coupling Type 1, QCC-1 connector Tank LP/PROPANE TANK REQUIREMENTS A dented or rusty LP/Propane tank may be hazardous and should be checked by your tank supplier. Never use a cylinder with a damaged valve. All tanks should be equipped with an OPD (overfilling protection device). This is a DOT requirement for all tanks purchased after October 1, 1998 and will ensure that the tank is not overfilled. The LP/Propane tank should be a standard 5-gal, 20 lb. gas cylinder tank approximately 12" in diameter and 18" high which must be constructed and marked in accordance with the Specifications for LP/Propane Gas Cylinders of the U.S. Department of Transportation (D.O.T.) or the National Standard of Canada, CAN/CSA-B339, Cylinders, Spheres and Tubes for Transportation of Dangerous Goods; and Commission. The cylinder connection device must be compatible with the Type 1, QCC-1 connector on the outdoor cooking appliance. The cylinder must be provided with a shut-off valve terminating in an LP/Propane gas supply cylinder valve outlet specified, as applicable, for a 5LP-A connection. The cylinder supply system must be arranged for vapor withdrawal and provided with a listed overfilling prevention device. If the appliance is stored indoors the cylinder must be disconnected and removed from the appliance. Cylinders must be stored outdoors in a well-vented area out of the reach of children. 11
-
 1
1 -
 2
2 -
 3
3 -
 4
4 -
 5
5 -
 6
6 -
 7
7 -
 8
8
 |
 |