Viking TVDR361 Installation Instructions - Page 14
General Information
 |
View all Viking TVDR361 manuals
Add to My Manuals
Save this manual to your list of manuals |
Page 14 highlights
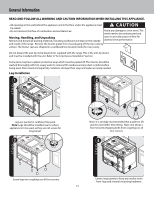
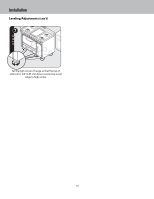
General Information READ AND FOLLOW ALL WARNING AND CAUTION INFORMATION WHEN INSTALLING THIS APPLIANCE. • All openings in the wall behind the appliance and in the floor under the appliance must be sealed. • Do not obstruct the flow of combustion and ventilation air. CAUTION Avoid any damage to oven vents. The vents need to be unobstructed and Moving, Handling, and Unpacking open to provide proper airflow for Remove and discard all packing materials, including cardboard and tape on the outside optimal oven performance. and inside of the range. Remove the burner grates from its packaging off the top cooking surface. The burner caps are shipped in a cardboard box located inside the oven cavity. Do not discard the anti-tip metal brackets (2) supplied with the range. This is the anti-tip device and must be installed with the unit. Refer to "Anti-tip Device Installation" section. Some parts may have a plastic protective wrap which must be peeled off. The interior should be washed thoroughly with hot, soapy water to remove film residues and any dust or debris before being used, then rinsed and wiped dry. Solutions stronger than soap and water are rarely needed. Leg Installation 1 2 Legs are packed in cardboard top pack. Note: Legs should be installed near to where appliance is to be used, as they are not secure for long transit. 3 1 2 1 3 Note: It is strongly recommended that a pallet or lift jack be used rather than tilting. Raise unit about a foot. Unscrew shipping bolts from couplings on all four corners. 4 Screw legs into couplings on all four corners. 14 Lower range gently to keep any undue strain from legs and internal mounting hardware.
-
 1
1 -
2
-
3
-
4
-
5
-
6
-
7
-
8
-
 9
9 -
 10
10 -
 11
11 -
 12
12 -
 13
13 -
 14
14 -
 15
15 -
 16
16 -
 17
17 -
 18
18 -
 19
19 -
20
-
21
-
22
-
23
-
24
 |
 |
