Vivitar CV-1225V VIV CV 1225V Manual - Page 10
Photo Capture Shoot Mode
 |
View all Vivitar CV-1225V manuals
Add to My Manuals
Save this manual to your list of manuals |
Page 10 highlights
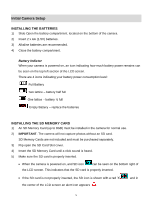
Photo Capture (Shoot) Mode TAKING A PICTURE 1) Turn on your digital camera. 2) Flip up and open the LCD display. 3) The camera automatically opens to the Photo Capture (Shoot) Mode. 4) The camera icon will appear on the top right corner of the LCD. 5) The amount of photos that can be captured with the available memory and as per the selected resolution will appear on the bottom section of the LCD screen. Note: The amount shown is for your reference only since the actual picture size will vary according to the object you want to take a photo of and the surrounding environment. 6) Use the LCD display to direct the camera at the scene you would like to capture. The box in the center of the screen with the white border indicates the center for capturing your image. 7) Press the Shoot/Right button to capture and save your photo to the memory card. Note: There will be a short delay while the camera saves the photo in JPG format to your memory card. The preview of the captured photo will be shown for a moment on the LCD screen. When the Continuous Shot Mode feature is used, the 3 captured photos will all appear together on the LCD screen - 品 9
-
 1
1 -
2
-
3
-
4
-
 5
5 -
 6
6 -
 7
7 -
 8
8 -
 9
9 -
 10
10 -
 11
11 -
 12
12 -
 13
13 -
 14
14 -
 15
15 -
16
-
17
-
18
-
19
-
20
-
21
-
22
-
23
-
24
-
25
-
26
 |
 |
