Vivitar CV-1225V VIV CV 1225V Manual - Page 6
Initial Camera Setup
 |
View all Vivitar CV-1225V manuals
Add to My Manuals
Save this manual to your list of manuals |
Page 6 highlights
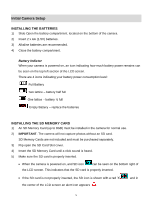
Initial Camera Setup INSTALLING THE BATTERIES 1) Slide Open the battery compartment, located on the bottom of the camera. 2) Insert 2 x AA (1.5V) batteries. 3) Alkaline batteries are recommended. 4) Close the battery compartment. Battery Indictor When your camera is powered on, an icon indicating how much battery power remains can be seen on the top left section of the LCD screen. There are 4 icons indicating your battery power consumption level: Full Battery Two lattice - battery half full One lattice - battery ¼ full Empty Battery - replace the batteries INSTALLING THE SD MEMORY CARD 1) An SD Memory Card (up to 8GB) must be installed in the camera for normal use. 2) IMPORTANT: The camera will not capture photos without an SD card. SD Memory Cards are not included and must be purchased separately. 3) Flip open the SD Card Slot cover. 4) Insert the SD Memory Card until a click sound is heard. 5) Make sure the SD card is properly inserted. When the camera is powered on, and SD icon can be seen on the bottom right of the LCD screen. This indicates that the SD card is properly inserted. If the SD card is not properly inserted, the SD icon is shown with a red „X‟ the center of the LCD screen an alert icon appears . and in 5
-
 1
1 -
 2
2 -
 3
3 -
 4
4 -
 5
5 -
 6
6 -
 7
7 -
 8
8 -
 9
9 -
 10
10 -
 11
11 -
 12
12 -
13
-
14
-
15
-
16
-
17
-
18
-
19
-
20
-
21
-
22
-
23
-
24
-
25
-
26
 |
 |
