Vizio D43f-F1 User Manual - Page 33
Setting the Time and Local Settings
 |
View all Vizio D43f-F1 manuals
Add to My Manuals
Save this manual to your list of manuals |
Page 33 highlights
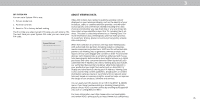
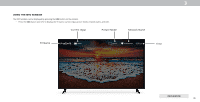
3 Setting the Time and Local Settings To ensure the correct time is displayed when you press the INFO button, set the TV's time zone: 1. Press the Menu button on the remote. The on-screen menu is displayed. Back June 11, 2015 11:48AM 2. Use the Arrow buttons on the remote to highlight System and press OK. The SYSTEM menu is displayed. 3. Use the Arrow buttons on the remote to highlight Time & Local Settings and press OK. The menu headed by the local date and time is displayed. Time Zone Pacific (-8) Daylight Savings Time Auto Time Format Country USA 4. Highlight Time Zone and press OK. The TIME ZONE menu is displayed. 5. Highlight your time zone and press OK. 6. Highlight Daylight Saving Time and press OK. The DAYLIGHT SAVING TIME menu is displayed. Choose On if it is currently Daylight Savings Time, Off if it is Standard Time, or Auto to have the system automatically detect Daylight Savings Settings. 7. Press the Exit button on the remote. Adjusting the CEC Settings The CEC function on your TV enables you to control devices connected to HDMI (ARC) input with the included remote, without any programming. Using CEC, your VIZIO TV remote can control: • Power On/Off • Volume • Mute Not all HDMI devices support CEC. See your device's user manual for details. To enable, disable, or adjust CEC settings: 1. Set up your audio device and connect it to the HDMI-1(HDMI Arc) input on the TV 2. On your audio device, select the HDMI ARC input 3. Press the Menu button on the remote. The on-screen menu is displayed. 4. Use the Arrow buttons on the remote to highlight System and press OK. The SYSTEM menu is displayed. 5. Use the Arrow buttons on the remote to highlight CEC and press OK. The CEC menu is displayed. 6. Highligh CEC and press OK. Select a setting and then press OK. • CEC - To use CEC, you must select Enable. • Device Discovery - To determain if your device is connected and supports CEC, select Device Discovery and then press OK. 7. Press the Exit button on the remote. Turning the Power Indicator On or Off The Power Indicator on the front of your TV normally does not glow when the TV is on. You can change this setting if you prefer the light to be on. To turn the Power Indicator Light On or Off: 1. Press the Menu button on the remote. The on-screen menu is displayed. 2. Use the Arrow buttons on the remote to highlight System and press OK. The SYSTEM menu is displayed. 3. Highlight Power Indicator and press OK. 4. Use the Up/Down Arrow buttons to select On or Off, then press OK. 32
-
 1
1 -
2
-
3
-
4
-
5
-
6
-
7
-
8
-
9
-
10
-
11
-
12
-
13
-
14
-
15
-
16
-
17
-
18
-
19
-
20
-
21
-
22
-
23
-
24
-
25
-
26
-
27
-
 28
28 -
 29
29 -
 30
30 -
 31
31 -
 32
32 -
 33
33 -
 34
34 -
 35
35 -
 36
36 -
 37
37 -
 38
38 -
39
-
40
-
41
-
42
-
43
-
44
-
45
-
46
-
47
-
48
-
49
-
50
-
51
-
52
-
53
-
54
-
55
-
56
-
57
 |
 |