Vizio E260VA E190VA User Manual - Page 25
Arrow, Photo, MENU/OK, Pause, Thumbnail, Thumbnail Size, Small, Medium, Large
 |
View all Vizio E260VA manuals
Add to My Manuals
Save this manual to your list of manuals |
Page 25 highlights
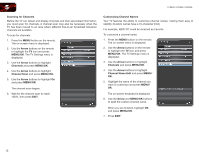
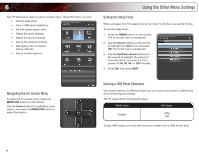
E190VA / E220VA / E260VA Remember: • The USB thumb drive must be formatted as FAT32 • Files on the USB thumb drive must be a supported file type • The USB thumb drive must have a minimum 1GB memory • The TV will not play media from external hard drives or mp3 players To play your USB media: 1. Load your photos onto a USB thumb drive using your home computer. 2. Insert the USB thumb drive into the USB port on the left side of the TV. The photos on your USB thumb drive will be displayed automatically. If your thumb drive is already inserted, continue with step 3. 3. Press the MENU button on the remote. The on-screen menu is displayed. 4. Use the Arrow buttons on the remote to highlight the Photo icon and press MENU/OK. The Photo screen is displayed. 5. Use the Arrow buttons on the remote to highlight the photo you would like to be displayed first, then press the Play button. The slideshow begins. • To pause the slideshow, press the Pause button. • To go to the previous photo, press the Stop button. • To exit the slideshow, press the EXIT button. 6 Customizing the Photo Display Screen The Photo menu can be displayed as a list or as a grid of thumbnail images. The images can also be sorted by date or by name. To customize the photo display screen: 1. From the photo screen, use the Arrow buttons on the remote to highlight an image, then press MENU/OK. The menu is displayed on the left side of the screen. 2. Highlight one of the following options and press MENU/OK: • Sort - Select to change the display order of photos. Choose Date or Name. • File - Select to change the method of displaying photos. Choose List or Thumbnail. • Thumbnail Size - Select to change the size of displayed thumbnail images. Choose Small, Medium, or Large. 17
-
 1
1 -
2
-
3
-
4
-
5
-
6
-
7
-
8
-
9
-
10
-
11
-
12
-
13
-
14
-
15
-
16
-
17
-
18
-
19
-
 20
20 -
 21
21 -
 22
22 -
 23
23 -
 24
24 -
 25
25 -
 26
26 -
 27
27 -
 28
28 -
 29
29 -
 30
30 -
31
-
32
-
33
-
34
-
35
-
36
-
37
-
38
-
39
-
40
-
41
-
42
-
43
-
44
-
45
-
46
-
47
-
48
 |
 |
