Vizio VP422HDTV10A User Manual - Page 12
VIZIO Re, VIZIO Remote Control, mote Control - no power
 |
UPC - 857380001345
View all Vizio VP422HDTV10A manuals
Add to My Manuals
Save this manual to your list of manuals |
Page 12 highlights
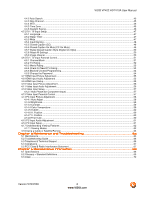
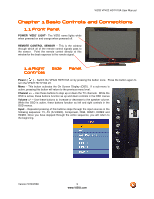
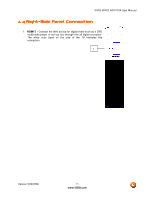
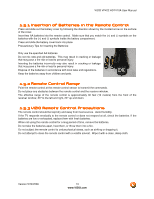
VIZIO VP422 HDTV10A User Manual 1.5 VIZIO Remote Control GUIDE - This button displays program information. Press this button once and the information of the program being viewed is shown. Press it a second time and the Electronic Programming Guide will appear in the screen. POWER - Press this button to turn the TV on from the Standby mode. Press it again to return to the Standby mode. TV - Press this button to select TV. AV - Press this button to select the Audio Video input. Pressing this button repeatedly will get you to the AV input. Keep in mind that if S-Video cable is being used, then AV will show the signal going through this input as the Svideo takes priority. COMP - Press this button to select the Component (YPbPr) input. Pressing this button repeatedly will take you through the Component input. HDMI - Press this button to select the HDMI input. Pressing this button repeatedly will get you through the HDMI (HDMI1, HDMI2 and HDMI3) different inputs. MENU - Use this button for the On-Screen Display (OSD) menus. When use within the OSD menus, pressing this key will make the selection of an option. - These buttons navigate the On-Screen Display (OSD). MUTE - This button turns the sound on and off. LAST - This button recalls the previously viewed channel when it is used in TV mode; meaning that the TV unit has control over the signal or program being watched. This button also has different functions when being used in conjunction with the On-Screen Display (OSD) menu. VOL (+ or -) - These buttons turn the volume up or down. CH (+ or -) - These buttons change the channels up or down. NUMBER BUTTON PAD - Use these buttons to select a channel or enter a password. INPUT - This button allows the user to cycle through the inputs. Repeatedly pressing of this button will step you through the input sources in the following sequence: TV, AV (S-Video), Component, RGB, HDMI1, HDMI2 and HDMI3. Once you have stepped through the entire sequence, you will return to the beginning. - (DASH) - When selecting a digital channel directly, use this button for the separation of main and sub-channels. For example, channel 28-2 would be selected by the button sequence 2 8 - 2. Version 5/29/2008 12 www.VIZIO.com
-
 1
1 -
2
-
3
-
4
-
5
-
6
-
 7
7 -
 8
8 -
 9
9 -
 10
10 -
 11
11 -
 12
12 -
 13
13 -
 14
14 -
 15
15 -
 16
16 -
 17
17 -
18
-
19
-
20
-
21
-
22
-
23
-
24
-
25
-
26
-
27
-
28
-
29
-
30
-
31
-
32
-
33
-
34
-
35
-
36
-
37
-
38
-
39
-
40
-
41
-
42
-
43
-
44
-
45
-
46
-
47
-
48
-
49
-
50
-
51
-
52
-
53
-
54
-
55
-
56
-
57
-
58
-
59
-
60
-
61
-
62
-
63
-
64
-
65
-
66
-
67
-
68
-
69
-
70
-
71
 |
 |