Vtech vt40-2420 User Manual - Page 6

Handset and Base Unit Security Codes - battery

Page 6 highlights

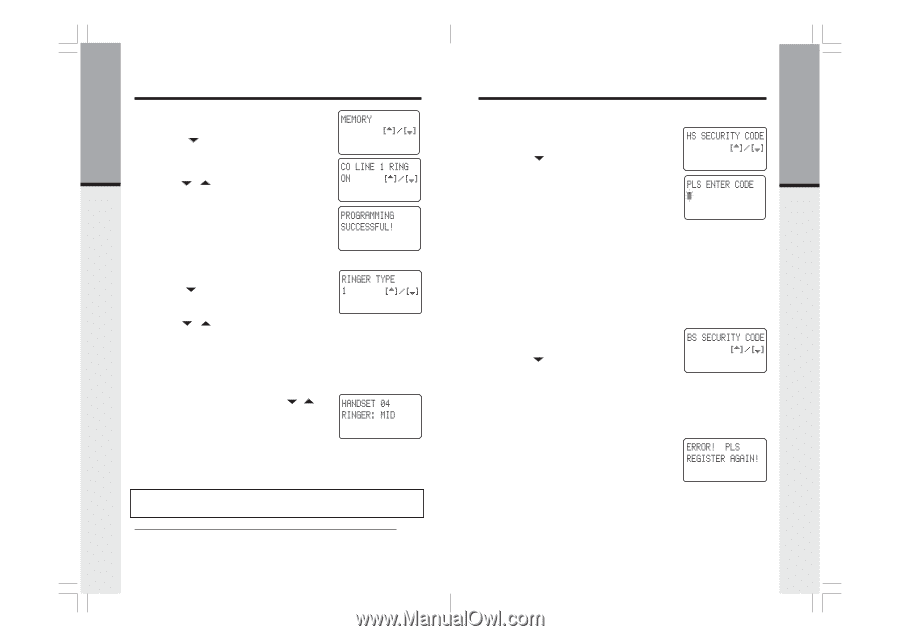
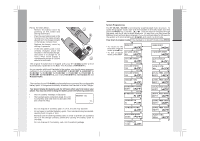
Getting Started Getting Started Setup Ringer ON/OFF • Access program mode • Press the ( ) key until you see CO LINE 1 RING • Press the # key to change settings. The cursor will blink to the right of the current setting • Use the ( / ) volume keys to select either ON or OFF. • Press the # key to confirm choice. • PROGRAMMING SUCCESSFUL! is displayed. • Repeat the above steps to set ringers for LINE 2, LINE 3 and LINE 4 Ringer Type • Access program mode • Press the ( ) key until you see RINGER TYPE • Press the # key to change settings. The cursor will blink to the right of the current ringer setting • Use the ( / ) volume keys to sample the four ringer types • Press the # key to confirm choice • PROGRAMMING SUCCESSFUL! is displayed, and the selected ringer type will be played once. Ringer Volume Control • From the idle (off) mode press the ( / ) volume keys to select volume level LOW / MID / HIGH Handset and Base Unit Security Codes The VT 40-2421 is an advanced telephone system, which uses a unique 6-digit security code for operation. The VT 40-2421 Handset and Base unit are factory programmed with a default security code, which allows you use the system after charging. NOTE: When using multiple Handsets, you must assign a 6-digit system security code (shared by all Handsets and Base Unit), and each Handset must be assigned its own unique HANDSET ID (extension) number. Assigning the Handset Security Code and Loading into the Base Unit • Disconnect the AC power to the base unit. 10 Setup • Made sure that only HANDSET 01 has a battery pack installed. All other Handsets need to have their battery packs removed during this process. • Access program mode • Press the ( ) key until you see HS SECURITY CODE • Press the # key to change settings. You will be prompted to PLS ENTER CODE, waiting for you to input a 6-digit security code. This security code is selected by you, so please choose a security code that you will remember. Also, record the HS SECURITY CODE in the space below for future reference. SECURITY CODE • Use the number keys to enter the 6 digit HS SECURITY CODE (i.e. 123456, 223455, 000005, etc.) • Press the # key to confirm choice • PROGRAMMING SUCCESSFUL! is displayed. You now need to load the HS SECURITY CODE into the Base Unit, using HANDSET 01. Please follow these steps: • The Base Unit power should still be disconnected. • Access program mode • Press the ( ) key until you see BS SECURITY CODE • Reconnect the Base Unit power. Once the power is connected, you have only 10 seconds to complete the next step. • With BS SECURITY CODE displayed on HANDSET 01, press the # key. The HS SECURITY CODE has now been loaded into the Base Unit. • PROGRAMMING SUCCESSFUL! is displayed. • If you fail in loading the HS SECURITY CODE into the Base Unit, ERROR! PLS REGISTER AGAIN! is displayed, you have to repeat the above 6 steps to load into the Base Unit until PROGRAMMING SUCCESSFUL! is displayed. Handset ID The VT 40-2421 system supports up to 12 extension handsets. In order to use the multiple handset capability of this product, you must first assign a 6-digit security code. Please refer to Handset and Base Unit Security Codes before proceeding with Handset ID. 11

  • 1
  • 2
  • 3
  • 4
  • 5
  • 6
  • 7
  • 8
  • 9
  • 10
  • 11
  • 12
  • 13
  • 14
  • 15
  • 16
  • 17
  • 18
  • 19
  • 20
  • 21

11
10
Setup
Getting Started
Setup
Ringer ON/OFF
Access
program
mode
Press the (
) key until you see
CO LINE 1
CO LINE 1
CO LINE 1
CO LINE 1
CO LINE 1
RING
RING
RING
RING
RING
Press the
#
key to change settings.
The cursor
will blink to the right of the current setting
Use the (
/
) volume keys to select either
ON
ON
ON
ON
ON
or
OFF
OFF
OFF
OFF
OFF
.
Press the
#
key to confirm choice.
PROGRAMMING SUCCESSFUL!
is displayed.
Repeat the above steps to set ringers for LINE
2, LINE 3 and LINE 4
Ringer Type
Access
program
mode
Press the (
) key until you see
RINGER TYPE
RINGER TYPE
RINGER TYPE
RINGER TYPE
RINGER TYPE
Press the
#
key to change settings.
The cursor
will blink to the right of the current ringer setting
Use the (
/
) volume keys to sample the
four ringer types
Press the
#
key to confirm choice
PROGRAMMING SUCCESSFUL!
is displayed, and
the selected ringer type will be played once.
Ringer Volume Control
From the idle (off) mode press the (
/
)
volume keys to select volume level LOW / MID
/ HIGH
Handset and Base Unit Security Codes
Getting Started
Made sure that only HANDSET 01 has a battery
pack installed. All other Handsets need to have
their battery packs removed during this process.
Access
program
mode
Press the (
) key until you see
HS SECURITY
HS SECURITY
HS SECURITY
HS SECURITY
HS SECURITY
CODE
CODE
CODE
CODE
CODE
Press the
#
key to change settings. You will be
prompted to
PLS ENTER CODE
PLS ENTER CODE
PLS ENTER CODE
PLS ENTER CODE
PLS ENTER CODE
, waiting for you
to input a 6-digit security code. This security code
is selected by you, so please choose a security code
that you will remember. Also, record the
HS
HS
HS
HS
HS
SECURITY CODE
SECURITY CODE
SECURITY CODE
SECURITY CODE
SECURITY CODE
in the space below for future
reference.
SECURITY CODE:________________
Use the number keys to enter the 6 digit
HS
HS
HS
HS
HS
SECURITY CODE
SECURITY CODE
SECURITY CODE
SECURITY CODE
SECURITY CODE
(i.e. 123456, 223455, 000005, etc.)
Press the
#
key to confirm choice
PROGRAMMING SUCCESSFUL!
is displayed.
You now need to load the
HS SECURITY CODE
HS SECURITY CODE
HS SECURITY CODE
HS SECURITY CODE
HS SECURITY CODE
into
the Base Unit, using HANDSET 01. Please follow these
steps:
The Base Unit power should still be disconnected.
Access
program
mode
Press the (
) key until you see
BS SECURITY
BS SECURITY
BS SECURITY
BS SECURITY
BS SECURITY
CODE
CODE
CODE
CODE
CODE
Reconnect the Base Unit power.
Once the power
is connected, you have only 10 seconds to
complete the next step
.
With
BS SECURITY CODE
BS SECURITY CODE
BS SECURITY CODE
BS SECURITY CODE
BS SECURITY CODE
displayed on HANDSET
01, press the
#
key. The
HS SECURITY CODE
HS SECURITY CODE
HS SECURITY CODE
HS SECURITY CODE
HS SECURITY CODE
has
now been loaded into the Base Unit.
PROGRAMMING SUCCESSFUL!
is displayed.
If you fail in loading the
HS SECURITY CODE
HS SECURITY CODE
HS SECURITY CODE
HS SECURITY CODE
HS SECURITY CODE
into
the Base Unit,
ERROR! PLS REGISTER AGAIN!
is displayed, you have to repeat the above 6 steps
to load into the Base Unit until
PROGRAMMING
PROGRAMMING
PROGRAMMING
PROGRAMMING
PROGRAMMING
SUCCESSFUL!
SUCCESSFUL!
SUCCESSFUL!
SUCCESSFUL!
SUCCESSFUL!
is displayed.
The
VT 40-2421
is an advanced telephone system, which uses a unique 6-digit
security code for operation. The
VT 40-2421
Handset and Base unit are factory
programmed with a default security code, which allows you use the system after
charging.
NOTE: When using multiple Handsets, you must assign a 6-digit system
security code (shared by all Handsets and Base Unit), and each Handset must
be assigned its own unique HANDSET ID (extension) number.
Assigning the Handset Security Code and Loading into the Base Unit
Disconnect the AC power to the base unit.
Handset ID
The
VT 40-2421
system supports up to 12 extension handsets. In order to use
the multiple handset capability of this product,
you must first assign a 6-digit
security code
. Please refer to
Handset and Base Unit Security Codes
before
proceeding with Handset ID.