Waring WPC100 Instruction Manual - Page 7
Installation, Stand Alone Instructions For Installation, Plumbed Instructions For Installation
 |
View all Waring WPC100 manuals
Add to My Manuals
Save this manual to your list of manuals |
Page 7 highlights
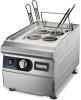
INSTALLATION Carefully remove the pasta cooker from the packaging and place the unit on a firm, level surface. Insert the basket hanger into the two holes in the brackets, located in the rear of the unit. Use only the baskets provided with the unit. DO NOT substitute the baskets or attempt to replace the baskets. Rear of Unit This unit is to be installed with adequate backflow protection to comply with applicable federal, state, and local codes. This unit can also be used as a stand-alone, without external plumbing connections. STAND ALONE INSTRUCTIONS FOR INSTALLATION Make sure all three valves are in the closed position. There are two located in the front of the unit and one located on the back of the unit. Fill unit with a bucket of tap water up to the fill line (just below the overflow drain). PLUMBED INSTRUCTIONS FOR INSTALLATION Connect to the refill (located on back of pasta cooker) and overflow plumbing connections. The refill plumbing connection is a male NPT ½ x 12. The overflow plumbing connection is a female NPT ½ x 12. If connecting to an outside water line, the plumbing connections must contain water pressurized at or below Water Line Pressure and at or below 40˚C (104˚F) during normal operation. If using a rubber hose: It must have a Reinforcing Outer Braid, and have a manufacturer's rating of at least 200 psig. Make sure the water overflow outlet valve (located on back of pasta cooker) is in the open position. Open the water refill valve (located on the front of the pasta cooker) to fill the basin with water. The valve can be adjusted between open and close positions to control the water flow into the basin. BACK FRONT 7
-
 1
1 -
 2
2 -
 3
3 -
 4
4 -
 5
5 -
 6
6 -
 7
7 -
 8
8 -
 9
9 -
 10
10 -
 11
11 -
 12
12 -
13
-
14
-
15
-
16
-
17
-
18
-
19
-
20
-
21
-
22
-
23
-
24
-
25
-
26
-
27
-
28
-
29
-
30
-
31
-
32
-
33
-
34
-
35
-
36
-
37
-
38
-
39
-
40
-
41
-
42
-
43
-
44
 |
 |
