Waring WWD200 Instruction Manual - Page 5
Tips For Making Perfect Waffle Cones, Cleaning And Maintenance - commercial
 |
View all Waring WWD200 manuals
Add to My Manuals
Save this manual to your list of manuals |
Page 5 highlights
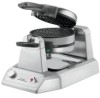
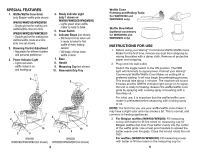
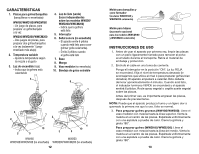
We recommend setting #4 for Belgian waffle recipes. If you prefer crisper, darker Belgian waffles, increase the browning control. For evenly filled waffles, pour the batter into the center of the lower grid and spread out evenly to the edges. The entire lower grid should be filled. For best results, we recommend using ¾ cup batter or enough to fill the entire lower grid. For added convenience while baking waffles, rest measuring scoop with handle hanging on outside of bowl and scoop on inside of bowl until the next baking cycle. To measure flour, stir the flour first to aerate it, since it settles when it sits. Then spoon it into a measuring cup, leveling off the top with the back of a knife - do not pack down into measuring cup. These quick steps will help you avoid "heavy waffles." Belgian waffles taste best when made to order, but baked Belgian waffles may be kept warm in a 200˚F oven. Place in a baking pan or wrap in foil while in the oven. Waffles wrapped in foil may lose their crispness. Baked waffles may be frozen. Allow to cool completely, and then place in plastic food storage bag. Use waxed paper to keep waffles separated. Reheat in an oven, toaster or toaster oven when ready to use. TIPS FOR MAKING PERFECT WAFFLE CONES We recommend setting #4 when using commercial waffle cone mixes and batter recipes. If you prefer crisper, darker waffle cones, increase the browning control number. For evenly filled waffle cones, place the batter in the center of the lower grid and close the grid immediately. Most batters will spread out evenly with the pressure of the upper grid. If you have a very thick batter, you may need to spread the batter out a little more, very quickly, with a heat-proof spatula. While rolling the waffle cone, concentrate on keeping the edge of the waffle nearest to the tip of the rolling tool. This will become the tip of the cone and it is best to have a sealed tip when using ice cream. Allow waffle cones to cool completely for desired results, before placing ice cream or any other fillng in the cone. 8 CLEANING AND MAINTENANCE Once you have finished baking, turn control knob to setting #1, switch toggle to OFF position and remove plug from electrical outlet. Leave top lid open and allow grids to cool before cleaning. Never take your waffle/waffle cone maker apart for cleaning. Simply brush crumbs from grooves and absorb any excess cooking oil by wiping with a dry cloth or paper towel. You may clean the grids by wiping with a damp cloth to prevent staining and sticking from batter or oil buildup. Be certain grids have cooled completely before cleaning. If batter adheres to plates, simply pour a little cooking oil onto the baked batter and let stand approximately 5 minutes, thus allowing batter to soften for easy removal. To clean exterior, wipe with a soft dry cloth. Never use an abrasive cleanser or harsh pad. NEVER IMMERSE CORD, PLUG OR UNIT IN WATER OR OTHER LIQUIDS. Any other servicing should be performed by an authorized service center. Limited ONE Year Warranty Waring warrants every new Waring® Commercial Waffle/Waffle Cone Maker to be free from defects in material and workmanship for a period of one year from the date of purchase when used with foodstuffs, nonabrasive liquids (other than detergents) and nonabrasive semi-liquids, providing it has not been subject to loads in excess of the indicated rating. Under this warranty, Waring will repair or replace any part which, upon our examination, is defective in materials or workmanship, provided the product is delivered prepaid to the Waring Service Center at: 314 Ella T. Grasso Ave. Torrington, CT 06790, or any Factory Approved Service Center. This warranty does not: a) apply to any product that has become worn, defective, damaged or broken due to use or due to repairs or servicing by other than the Waring Service Center or a Factory Approved Service Center, or due to abuse, misuse, overloading or tampering; or b) cover incidental or consequential damages of any kind. Warning: This warranty is void if appliance is used on Direct Current (DC). WARING COMMERCIAL 314 Ella T. Grasso Ave. Torrington, CT 06790 9
-
 1
1 -
 2
2 -
 3
3 -
 4
4 -
 5
5 -
 6
6 -
 7
7 -
 8
8 -
 9
9 -
 10
10 -
 11
11 -
12
-
13
-
14
-
15
 |
 |