Weider 244 Bench Uk Manual - Page 11
Warning, Adjustments
 |
View all Weider 244 Bench manuals
Add to My Manuals
Save this manual to your list of manuals |
Page 11 highlights
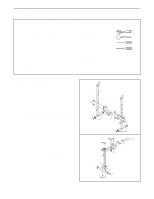
ADJUSTMENTS The weight bench is designed to be used with your own weight set (not included). The steps below explain how the weight bench can be adjusted. Make sure that all parts are properly tightened each time the weight bench is used. Replace any worn parts immediately. The weight bench can be cleaned with a damp cloth and mild, non-abrasive detergent. Never use solvents. ADJUSTING THE BACKREST 1 The Backrest (6) can be used in a declined position, a level position, or any of three inclined positions. For a declined position, remove the Support Rod (7) and lay the Backrest on the Crossbar (3). To use the Backrest (6) in a level position or an inclined position, insert the Support Rod (7) through one of the sets of holes in the Uprights (1). Rotate the Support Rod to the locked position, with the locking pin wrapped around the Upright. Lay the Backrest on the Support Rod. 6 1 7 Locking Pin 3 ATTACHING WEIGHTS TO THE WEIGHT CARRIAGE OR THE LEG LEVER To use the Weight Carriage (48), slide the two Weight Stops (28) onto the weight tubes as shown. Next, slide the desired weights onto the weight tubes and secure them with the two Weight Clips (50). Do not put more than 23 kg (50 lbs.) on the Weight Carriage. To use the Leg Lever (4), slide the desired weights onto the weight tube as shown. Secure the weight with a Weight Clip (50). Do not place more than 23 kg (50 lbs.) on the Leg Lever. To use some weights, a Weight Adapter (56) will need to be slid onto the Leg Lever. WARNING: When using the Leg Lever (4), place a barbell with the same amount of weight on the weight rests to balance the bench. ATTACHING WEIGHTS TO THE FLY ARMS To use a Fly Arm (25, 59 [not shown]), slide a Weight Stop (28) onto the weight tube on the Fly Arm as shown. Next, slide the desired weights onto the weight tube. Secure the weight with a Weight Clip (50). Do not place more than 14 kg (30 lbs.) on each Fly Arm. To use some weights, the Weight Adapter (56) will need to be slid onto the Fly Arm (25, 59 [not shown]). 50 28 4 Weight 50 56 Weight 48 50 25 28 56 50 Weight 11
-
 1
1 -
2
-
3
-
4
-
5
-
 6
6 -
 7
7 -
 8
8 -
 9
9 -
 10
10 -
 11
11 -
 12
12 -
 13
13 -
 14
14 -
 15
15 -
 16
16
 |
 |
