Weider 320 Bench English Manual - Page 8
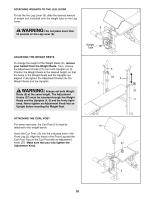
Attach the Curl Pad 17 to the Curl Post 13 using
 |
View all Weider 320 Bench manuals
Add to My Manuals
Save this manual to your list of manuals |
Page 8 highlights
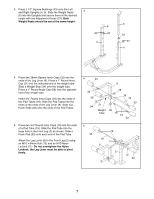
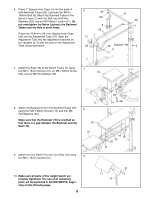
6. Press 1" Square Inner Caps (7) into the ends of 6 both Backrest Tubes (20). Lubricate the M10 x 39 168mm Bolt (8). Attach the Backrest Tubes to the Bench Frame (1) with the Bolt, two M10 Flat Pin Washers (29), and an M10 Nylon Locknut (11). Do not overtighten the Nylon Locknut; the Backrest 5 Tubes must be able to pivot freely. 20 37 39 7 Press two 25.4mm x 38.1mm Square Inner Caps (39) into the Adjustment Tube (37). Slide the 11 7 Adjustment Tube into the adjustment brackets on the Uprights (4, 5) with the pins on the Adjustment Tube facing downward. 29 29 Bracket 4 8 1 7. Attach the Seat (16) to the Bench Frame (1) using two M6 x 16mm Screws (31), an M6 x 62mm Screw 7 16 (38), and an M6 Flat Washer (26). 8. Attach the Backrest (15) to the Backrest Tubes (20) using four M6 x 38mm Screws (14) and four M6 Flat Washers (26). Make sure that the Backrest (15) is oriented so that there is a gap between the Backrest and the Seat (16). 8 15 16 9. Attach the Curl Pad (17) to the Curl Post (13) using 9 two M6 x 16mm Screws (31). 1 26 31 38 14 26 20 26 14 10. Make sure all parts of the weight bench are properly tightened. The use of all remaining parts will be explained in ADJUSTMENTS, beginning on the following page. 8 31 17 13
-
 1
1 -
2
-
 3
3 -
 4
4 -
 5
5 -
 6
6 -
 7
7 -
 8
8 -
 9
9 -
 10
10 -
 11
11 -
 12
12 -
 13
13 -
14
-
15
-
16
 |
 |
