Weider Club C670 Bench English Manual - Page 13
Attach the Center Top Frame 46 to the Left Top
 |
View all Weider Club C670 Bench manuals
Add to My Manuals
Save this manual to your list of manuals |
Page 13 highlights
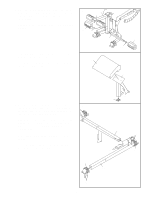
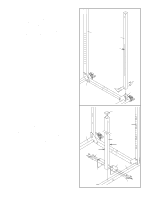
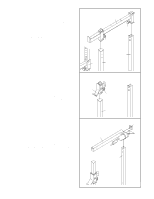
20. Press a 60mm Square Inner Cap (64) into the Weight Guide Base (41). Attach the Foot Plate (67) and the Weight Guide Base (41) to the Center Base (39) with two M10 x 81mm Button Bolts (104) and two M10 Nylon Locknuts (34). Do not tighten the Locknuts yet. 20 67 21. Attach the Center Top Frame (46) to the Left Top Frame (48) with two M10 x 78mm Bolts (32) and two M10 Nylon Locknuts (34). Make sure the decal is in the indicated location. Do not tighten the Locknuts yet. Attach the Center Top Frame (46) to the Right Top Frame (47) with two M10 x 78mm Bolts (32) and two M10 Nylon Locknuts (34). Do not tighten the Locknuts yet. 104 21 47 32 22. Slide the Weight Carriage Stop (65) onto the 22 Weight Guide Upright (42) as shown, and attach it at the indicated hole with an M10 x 87mm Bolt (106) and an M10 Nylon Locknut (34). Attach the Weight Guide Upright (42) to the Weight Guide Base (41) with two M10 x 75mm Bolts (92), four M10 Washers (35), and two M10 Nylon Locknuts (34). Do not tighten the Locknuts yet. 64 34 41 34 39 34 46 Decal 34 32 48 42 34 35 34 35 65 Hole 35 92 Hole closer to bottom 106 41 13
-
 1
1 -
2
-
3
-
4
-
5
-
6
-
7
-
 8
8 -
 9
9 -
 10
10 -
 11
11 -
 12
12 -
 13
13 -
 14
14 -
 15
15 -
 16
16 -
 17
17 -
 18
18 -
19
-
20
-
21
-
22
-
23
-
24
-
25
-
26
-
27
-
28
-
29
-
30
-
31
-
32
-
33
-
34
 |
 |
