Weider Platinum Xp800 Canadian English Manual - Page 13
Adjustments - exercises
 |
View all Weider Platinum Xp800 manuals
Add to My Manuals
Save this manual to your list of manuals |
Page 13 highlights
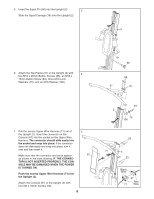
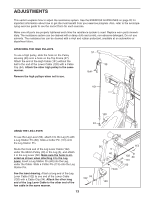
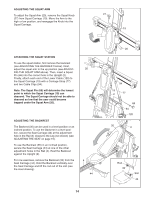
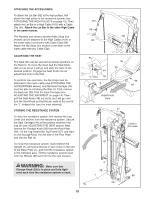
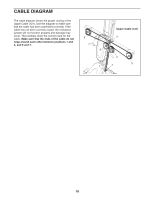
ADJUSTMENTS This section explains how to adjust the resistance system. See the EXERCISE GUIDELINES on page 20 for important information about how to get the most benefit from your exercise program. Also, refer to the accompanying exercise guide to see the correct form for each exercise. Make sure all parts are properly tightened each time the resistance system is used. Replace worn parts immediately. The resistance system can be cleaned with a damp cloth and a mild, non-abrasive detergent. Do not use solvents. The resistance bar can be cleaned with a vinyl and rubber protectant, available at an automotive or department store. ATTACHING THE HIGH PULLEYS To use a high pulley, slide the hook on the Pulley Housing (39) onto a hook on the Top Frame (37). Attach the end of the High Cable (101) without the ball to the end of the Lower Cable (120) with a Cable Clip (94). Attach the other high pulley in the same manner. Remove the high pulleys when not in use. 37 39 Ball 101 120 94 USING THE LEG LEVER To use the Leg Lever (56), attach it to the Leg (5) with a Leg Station Pin (60). Slide a Cotter Pin (113) onto the Leg Station Pin. Route the hook end of the Leg Lever Cable (102) under the 90mm Pulley (40) in the Leg (5), and attach it to the Leg Lever (56). Make sure the hook is oriented as shown when attaching it to the Leg Lever. Insert a Leg Station Pin (60) into the Leg, under the Cable. Slide a Cotter Pin (113) onto the Leg Station Pin. See the inset drawing. Attach a long end of the Leg Lever Cable (102) to one end of the Lower Cable (120) with a Cable Clip (94). Attach the other long end of the Leg Lever Cable to the other end of the low cable in the same manner. 94 102 13 56 5 40 Hook 120 113 102 60 113 60
-
 1
1 -
2
-
3
-
4
-
5
-
6
-
7
-
 8
8 -
 9
9 -
 10
10 -
 11
11 -
 12
12 -
 13
13 -
 14
14 -
 15
15 -
 16
16 -
 17
17 -
 18
18 -
19
-
20
-
21
-
22
-
23
-
24
-
25
-
26
-
27
 |
 |
