Weider Power Guide X2 User Manual - Page 8
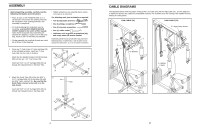
Grip 27 onto the Handle. Press a 1 Round Cap
 |
View all Weider Power Guide X2 manuals
Add to My Manuals
Save this manual to your list of manuals |
Page 8 highlights
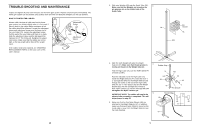
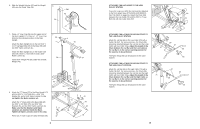
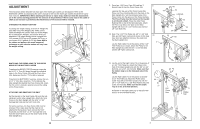
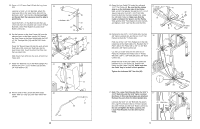
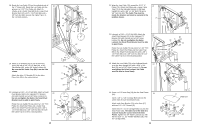
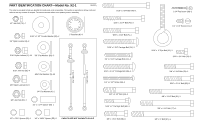
12. Press two 1 3/4" Inner Caps (24) into each of the Press Arms (29). Lubricate one of the axles on the Press Frame (33). Slide a Plastic Bushing (79) and a Press Arm (29) onto the axle. Make sure that the upper end of the Press Arm is between the Main Upright (41) and the bracket on the Press Frame. Tap two 1" Retainers (8) and a 1" Round Cover Cap (30) onto the axle. Make sure that the teeth on the Retainers are pointed toward the Plastic Cover Cap. (See the inset drawing.) Attach the other Press Arm (29) in the same manner. 12 41 29 Bracket 79 24 33 Lubricate 29 8 24 30 24 24 8 30 13. Wet the lower ends of the Press Arms (29) with 13 soapy water. Slide a 7" Foam Pad (25) onto each Press Arm. Attach a Handle (26) to one of the Press Arms (29) with a 5/16" x 2 1/4" Bolt (80), two 5/16" Flat Washers (5), a 1/2" x 13/32" Spacer (55), and a 5/16" Jam Nut (81) as shown. Wet the Handle (26) with soapy water. Slide a 5" Grip (27) onto the Handle. Press a 1" Round Cap (9) into the other end of the Handle. Attach the other Handle (26) to the other Press Arm (29) in the same manner. 14. Attach a Cable Trap (69) and two 3 1/2" Thin 14 Pulleys (4) to the Main Upright (41) with the 3/8" x 5" Bolt (67) and a 3/8" Jam Nut (82). Do not tight- en the Jam Nut yet. 5 29 81 9 25 26 29 26 27 55 5 80 41 82 4 69 4 67 8 29. Before using the home gym system, tighten the cables (see HOW TO TIGHTEN THE CABLES on 29 page 16 of this user's manual). In addition, pull each cable a few times to make sure that the cables move smoothly over the pulleys. If the cables do not move smoothly, locate and correct the problem before using the home gym system (see CABLE DIAGRAMS on page 17 of this user's manual). IMPORTANT: If the cables are not properly routed, they may be damaged when heavy weight is used. 1 62 Next, press down firmly on the Weight Bracket (62) and securely tighten the indicated 5/16" Nylon Locknut (1). 30. Remove the decals from the decal sheet (not shown), and apply them to the home gym system in the locations shown in the drawing below. 30 POWERGUIDE X2 BENCH PRESS/ 200 LBS MULTI-GYM WEIGHT DECALS 12.5 LBS 125 LBS 31. Make sure that all parts are properly tightened. The use of all remaining parts will be explained in ADJUSTMENT, beginning on page 14 of this user's manual. 13
-
 1
1 -
2
-
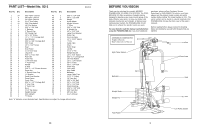 3
3 -
 4
4 -
 5
5 -
 6
6 -
 7
7 -
 8
8 -
 9
9 -
 10
10 -
 11
11 -
 12
12
 |
 |
