Weider Pro 375 English Manual - Page 11
Nylon Locknuts yet.
 |
View all Weider Pro 375 manuals
Add to My Manuals
Save this manual to your list of manuals |
Page 11 highlights
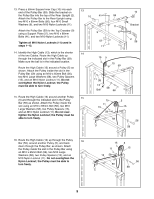
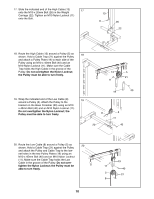
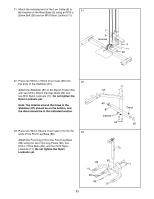
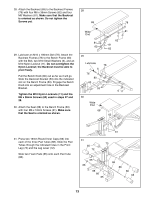
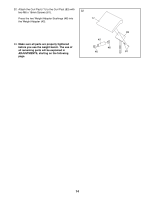
21. Attach the indicated end of the Low Cable (8) to the bracket on the Rear Base (3) using an M10 x 21 20mm Bolt (26) and an M10 Nylon Locknut (11). 8 Bracket 3 11 26 22. Press two 50mm x 70mm Inner Caps (60) into 22 the ends of the Stabilizer (87). Attach the Stabilizer (87) to the Bench Frame (63) with two M10 x 60mm Carriage Bolts (64) and two M10 Nylon Locknuts (11). Do not tighten the Nylon Locknuts yet. Note: The indents around the holes in the Stabilizer (87) should be on the bottom, and the decal should be in the indicated location. 23. Press two 50mm Square Inner Caps (10) into the 23 ends of the Front Leg Base (89). Attach the Front Leg (73) to the Front Leg Base (89) using the two Front Leg Plates (90), four M10 x 70mm Bolts (85), and four M10 Nylon Locknuts (11). Do not tighten the Nylon Locknuts yet. 11 63 60 87 Indents 64 Decal 60 73 89 90 11 10 85 85 10 11
-
 1
1 -
2
-
3
-
4
-
5
-
 6
6 -
 7
7 -
 8
8 -
 9
9 -
 10
10 -
 11
11 -
 12
12 -
 13
13 -
 14
14 -
 15
15 -
 16
16 -
17
-
18
-
19
-
20
-
21
-
22
-
23
 |
 |
