Weider Pro 9835 English Manual - Page 13
Nylon Locknut 42.
 |
View all Weider Pro 9835 manuals
Add to My Manuals
Save this manual to your list of manuals |
Page 13 highlights
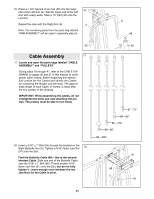
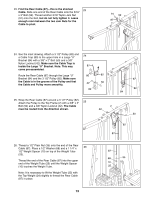
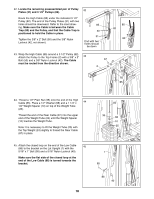
23. Find the Rear Cable (87)Ñthis is the shortest 23 Cable. Slide one end of the Rear Cable onto the 5/16Ó x 3Ó Bolt (92). Thread another 5/16Ó Nylon Jam Nut (91) onto the Bolt, but do not fully tighten it. Leave enough room between the two Jam Nuts for the Cable to pivot. 91 92 87 24. See the inset drawing. Attach a 3 1/2Ó Pulley (82) and a Cable Trap (80) to the upper hole in a Large ÒUÓ Bracket (84) with a 3/8Ó x 2Ó Bolt (50) and a 3/8Ó Nylon Locknut (42). Make sure the Cable Trap is inside the Large ÒUÓ Bracket. Note: This may come pre-assembled. 24 87 Route the Rear Cable (87) through the Large ÒUÓ Bracket (84) and the 3 1/2Ó Pulley (82). Make sure the Cable is in the groove of the Pulley and that the Cable and Pulley move smoothly. 80 82 42 50 84 87 82 84 25. Wrap the Rear Cable (87) around a 3 1/2Ó Pulley (82). Attach the Pulley to the Top Frame (2) with a 3/8Ó x 2Ó 25 Bolt (50) and a 3/8Ó Nylon Locknut (42). The Cable must be routed from the direction shown. 2 42 50 82 87 26. Thread a 1/2Ó Plain Nut (35) onto the end of the Rear Cable (87). Place a 1/2Ó Washer (68) and a 1 1/4Ó x 26 1/2Ó Weight Spacer (10) on top of the Weight Tube (25). Thread the end of the Rear Cable (87) into the upper end of the Weight Tube (25) until the Weight Spacer (10) touches the Weight Tube. Note: It is necessary to lift the Weight Tube (25) with the Top Weight (24) slightly to thread the Rear Cable (87) in place. 87 68 35 10 25 13
-
 1
1 -
2
-
3
-
4
-
5
-
6
-
7
-
 8
8 -
 9
9 -
 10
10 -
 11
11 -
 12
12 -
 13
13 -
 14
14 -
 15
15 -
 16
16 -
 17
17 -
 18
18 -
19
-
20
-
21
-
22
-
23
-
24
-
25
-
26
-
27
-
28
-
29
-
30
-
31
-
32
-
33
 |
 |
