Weider Pro 9835 English Manual - Page 19
Lay the Low Cable 86 over the Pulley. Re-attach
 |
View all Weider Pro 9835 manuals
Add to My Manuals
Save this manual to your list of manuals |
Page 19 highlights
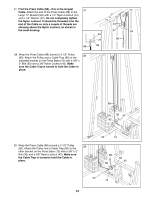
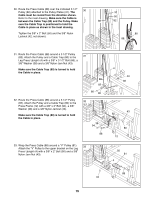
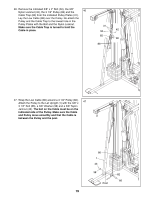
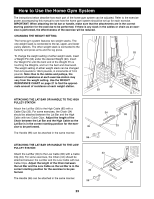
46. Remove the indicated 3/8Ó x 2Ó Bolt (50), the 3/8Ó Nylon Locknut (42), the 3 1/2Ó Pulley (82) and the 46 Cable Trap (80) from the indicated Pulley Plates (31). Lay the Low Cable (86) over the Pulley. Re-attach the Pulley and the Cable Trap to the lowest hole in the Pulley Plates with the Bolt and the Nylon Locknut. Make sure the Cable Trap is turned to hold the Cable in place. 31 50 42 82 80 86 47. Wrap the Low Cable (86) around a 3 1/2Ó Pulley (82). Attach the Pulley to the Lat Upright (1) with the 3/8Ó x 47 3 1/2Ó Bolt (66), a 3/8Ó Washer (38) and a 3/8Ó Nylon Jamnut (43). The ball on the Cable must be on the indicated side of the Pulley. Make sure the Cable and Pulley move smoothly and that the Cable is between the Pulley and the post. 86 1 43 38 82 66 Post 19
-
 1
1 -
2
-
3
-
4
-
5
-
6
-
7
-
8
-
9
-
10
-
11
-
12
-
13
-
 14
14 -
 15
15 -
 16
16 -
 17
17 -
 18
18 -
 19
19 -
 20
20 -
 21
21 -
 22
22 -
 23
23 -
 24
24 -
25
-
26
-
27
-
28
-
29
-
30
-
31
-
32
-
33
 |
 |
