Weider Pro 9835 English Manual - Page 18
Make sure the Cable is between the Cable
 |
View all Weider Pro 9835 manuals
Add to My Manuals
Save this manual to your list of manuals |
Page 18 highlights
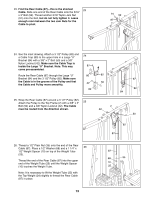
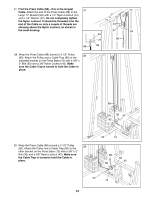
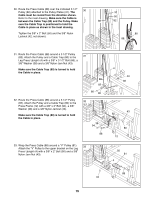
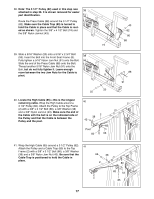
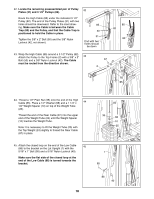
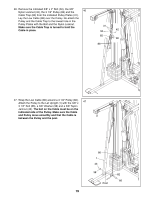
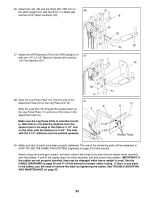
42. Locate the remaining preassembled pair of Pulley 42 Plates (31) and 3 1/2Ó Pulleys (82). Route the High Cable (85) under the indicated 3 1/2Ó Pulley (82). The end of the Pulley Plates (31) with two holes should be downward. Refer to the inset drawing. Make sure the Cable is between the Cable Trap (80) and the Pulley, and that the Cable Trap is positioned to hold the Cable in place. Tighten the 3/8Ó x 2Ó Bolt (50) and the 3/8Ó Nylon Locknut (42, not shown). 85 50 31 End with two holes should be down 85 82 80 43. Wrap the High Cable (85) around a 3 1/2Ó Pulley (82). Attach the Pulley to the Top Frame (2) with a 3/8Ó x 2Ó 43 Bolt (50) and a 3/8Ó Nylon Locknut (42). The Cable 42 must be routed from the direction shown. 2 50 82 85 44. Thread a 1/2Ó Plain Nut (35) onto the end of the High Cable (85). Place a 1/2Ó Washer (68) and a 1 1/4Ó x 44 1/2Ó Weight Spacer (10) on top of the Weight Tube (25). Thread the end of the Rear Cable (87) into the upper end of the Weight Tube (25) until the Weight Spacer (10) touches the Weight Tube. Note: It is necessary to lift the Weight Tube (25) with the Top Weight (24) slightly to thread the Rear Cable (87) in place. 85 35 68 10 25 45. Attach the closed loop on the end of the Low Cable 45 (86) to the bracket on the Lat Upright (1) with the 5/16Ó x 1Ó Bolt (95) and a 5/16Ó Nylon Locknut (40). Make sure the flat side of the closed loop at the end of the Low Cable (86) is turned towards the bracket. 1 95 86 40 18
-
 1
1 -
2
-
3
-
4
-
5
-
6
-
7
-
8
-
9
-
10
-
11
-
12
-
 13
13 -
 14
14 -
 15
15 -
 16
16 -
 17
17 -
 18
18 -
 19
19 -
 20
20 -
 21
21 -
 22
22 -
 23
23 -
24
-
25
-
26
-
27
-
28
-
29
-
30
-
31
-
32
-
33
 |
 |
