Weslo Cadence 36 English Manual - Page 16
Setting the On Timer
 |
View all Weslo Cadence 36 manuals
Add to My Manuals
Save this manual to your list of manuals |
Page 16 highlights
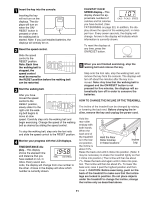
PICTURE LEVEL ADJUSTMENTS USING THE RECORDING TIMER Picture level controls are preset to nominal levels. If desired, you can individually adjust the contrast, brightness, color, or tint by following the steps below. 1. Press the MENU button to turn on the pop-up menu. CH MEMORY ANALOG CLOCK/TIMER 2. Press the + or Ð button to move the arrow to ANALOG. CH MEMORY ANALOG CLOCK/TIMER 3. Press the MENU button to select CONTRAST, BRIGHTNESS, COLOR, or TINT. CONTRAST 4. Press the + or Ð button to adjust the level. SELECTING VIDEO INPUT Press the TV/AV button on the TV to toggle between TV and VIDEO input. Your TV has the capability to turn on, switch to a channel for recording, and then turn off againÑall automatically. Follow the instructions below to use this feature. Note: When setting the clock, the on timer, or the off timer, if no buttons are pressed for four seconds, the TV will return to the normal screen. Setting the Clock 1. Press the MENU button to turn on the pop-up menu. CH MEMORY ANALOG CLOCK/TIMER 2. Press the + or Ð button to move the arrow to CLOCK/TIMER. CH MEMORY ANALOG CLOCK/TIMER 3. Press the MENU button to turn on the setting menu. CLOCK AM 12:00 ON TIME AM 12:00 OFF ON CH 02 TV OFF TIME AM 12:00 OFF 2. Press the + or Ð button to set the clock to the correct time. Setting the On Timer 1. After the clock has been set, press the MENU button to select ON TIME. CLOCK AM 12:00 ON TIME AM 12:00 OFF ON CH 02 TV OFF TIME AM 12:00 OFF 2. Press the + or Ð button to set the time that you want the TV to turn on. 16
-
 1
1 -
2
-
3
-
4
-
5
-
6
-
7
-
8
-
9
-
10
-
 11
11 -
 12
12 -
 13
13 -
 14
14 -
 15
15 -
 16
16 -
 17
17 -
 18
18 -
 19
19 -
 20
20 -
 21
21 -
22
-
23
-
24
-
25
-
26
 |
 |
