Weslo Cadence 835 English Manual - Page 11
treadmill.
 |
View all Weslo Cadence 835 manuals
Add to My Manuals
Save this manual to your list of manuals |
Page 11 highlights
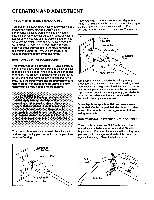
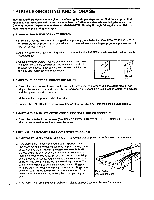
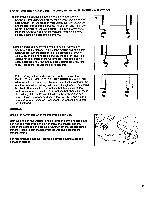
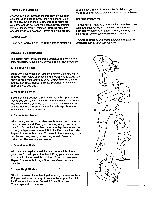
5. SYMPTOM: THE WALKING BELT IS OFF-CENTER OR SLIPS WHEN WALKED ON a. If the walking belt has shifted to the left, first remove the SAFEKEY and UNPLUG THE POWER CORD. Using the 3/16" alien wrench, turn the left rear roller adjustment bolt clockwise, and the right bolt counterclockwise, 1/4 of a turn each. Be careful not to overtighten the walking belt. Plug in the power cord, insert the SAFEKEY and run the treadmill for a few minutes. Repeat until the walking belt is centered. b. If the walking belt has shifted to the right, first remove the SAFEKEY and UNPLUG THE POWER CORD. Using the 3/16" alien wrench, turn the left rear roller adjustment bolt counterclockwise, and the right bolt clockwise, 1/4 of a turn each. Be careful not to overtighten the walking belt. Plug in the power cord, insert the SAFEKEY and run the treadmill for a few minutes. Repeat until the walking belt is centered. c. If the walking belt slips when walked on, first remove the SAFEKEY and UNPLUG THE POWER CORD. Using the 3/16" alien wrench, turn both rear roller adjustment bolts clockwise, 1/4 of a turn. When the walking belt is correctly tightened, you should be able to lift each side of the walking belt 3-4 inches off the walking platform. The center of the walking belt should just touch the walking platform. Be careful to keep the walking belt centered. Plug in the power cord, insert the SAFEKEY and run the treadmill for a few minutes. Repeat until the walking belt is properly tightened. STORAGE Unplug the power cord when the treadmill is not in use. Remove one bolt and washer from the lower end of the handrail, and one bolt and washer from the lower end of the handrail upright. Loosen the other bolt on each side. Carefully lay the console on the treadmill. Hand tighten the bolts with the washers back into the treadmill frame. Loosen It is recommended that the treadmill be covered during extended periods of storage. Remove- ) 11
-
 1
1 -
2
-
3
-
4
-
5
-
 6
6 -
 7
7 -
 8
8 -
 9
9 -
 10
10 -
 11
11 -
 12
12 -
 13
13 -
 14
14 -
 15
15 -
 16
16
 |
 |
