Weslo Expert 350 English Manual - Page 5
Operation, Adjustment
 |
View all Weslo Expert 350 manuals
Add to My Manuals
Save this manual to your list of manuals |
Page 5 highlights
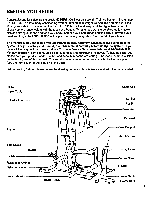
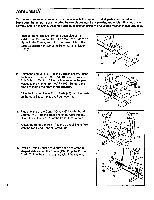
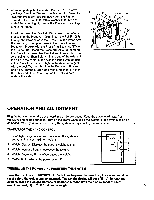
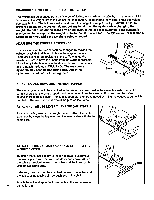
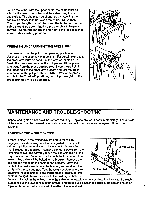
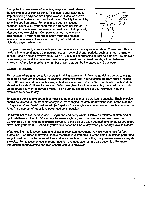
5. While supporting the Press Arm Bracket (79), remove the Press Arm Axle (38) from the Frame (19). Carefully 5 lower the Press Arm Bracket away from the Frame. Thread a Short Bolt (81), with a Washer (64), into one 3 end of the Axle. Lightly grease the Press Arm Bushings (37) in the Frame. Insert the Press Arm Bracket (79) between the L-shaped brackets on the Press Arm (36). Insert the Pull Pin (35) through the lower holes in the Press Arm and Press Arm Bracket. Align the upper holes in the Press Arm and Press Arm Bracket with the Press Arm Bushings (37) in the Frame (19). Insert the Press Arm Axle (38) through the Press Arm, Press Arm Bracket and Frame. Turn the Axle, using the Short Bolt (81) in the end of the Axle, until the hole in the center of the Axle is aligned with the hole in the Press Arm Bracket. Tighten the Axle Screw (40), with the Lock Washer (14), into the Press Arm Bracket and Axle. Thread a Short Bolt, with a Washer (64), into the other end of the Axle. Tighten the Bolts in both ends of the Axle. 64 Grease./ 81 °H -81 64 38 1440 35 79 36 OPERATION AND ADJUSTMENT Plug the transformer on the power cord into a 120-volt outlet. Keep the power cord away from walkways and heated surfaces. Turn on the power when using the system, or the system could be damaged. When you are finished using the system, always unplug the transformer. DIAGRAM OF THE HAND CONTROL 1. Low/High Range Indicator-Shows when the system is set at minimum or maximum weight. 2. Weight Display-Displays the current weight setting. 3. Weight Increase Button-Increases the weight. 4. Weight Decrease Button-Decreases the weight. 5. On/Off Button-Turns the power on or off. -1250 2 O AeL 3 WEIGHT 4 ON/OFF O 5 TURNING ON THE POWER AND RESETTING THE SYSTEM Press the on/off button. IMPORTANT: Each time the power is turned on, the system must be reset before the weight can be changed. The weight display will read "E-." To reset the system, press the weight increase or decrease buttons until the display reads "H250" (maximum weight) or "L30" (minimum weight). 5
-
 1
1 -
 2
2 -
 3
3 -
 4
4 -
 5
5 -
 6
6 -
 7
7 -
 8
8 -
 9
9 -
 10
10 -
 11
11 -
12
 |
 |
