Weslo Momentum 850 Instruction Manual - Page 6
Warning
 |
View all Weslo Momentum 850 manuals
Add to My Manuals
Save this manual to your list of manuals |
Page 6 highlights
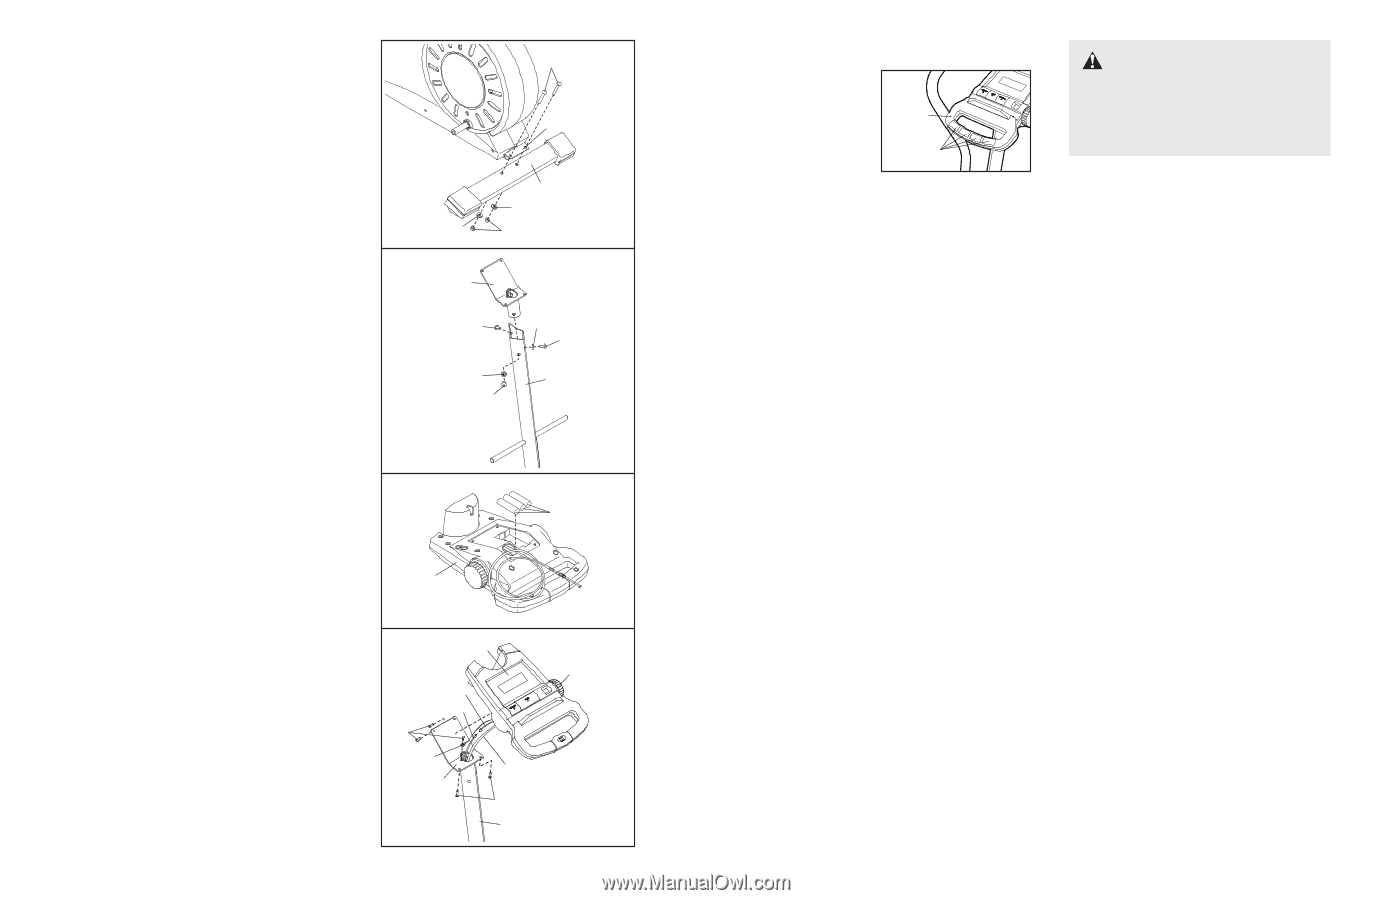
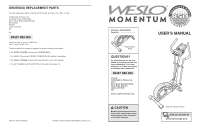
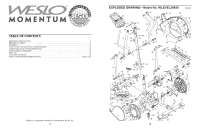
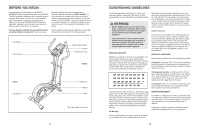
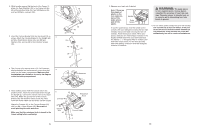
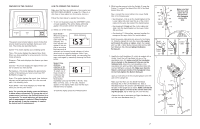
2. Whilst another person lifts the back of the Frame (1), 2 attach the Rear Stabilizer (28) to the Frame with two 34 M8 x 53mm Button Bolts (34), two M8 Washers (48), and two M8 Nylon Locknuts (38). 1 3. Insert the Console Bracket (63) into the Upright (2) as 3 shown. Attach the Console Bracket to the Upright with an M8 x 25mm Button Screw (45), two M8 Split Washers (59), and two M8 x 19mm Button Screws (68). 28 48 48 38 63 45 59 68 59 68 2 4. The Console (23) requires three 1.5V "AA" batteries; alkaline batteries are recommended. Insert three bat- 4 teries into the battery compartment. Make sure that the batteries are oriented as shown by the diagram inside the battery compartment. 23 Batteries 5. Have another person hold the Console (23) in the position shown. Insert the control cable down through the Upright (2). Connect the console wire to the Upper Wire (44). Attach the ground wire to the Console Bracket (63) with an M4 x 16mm Screw (42). Next, insert the excess cable and wire down into the Upright. Attach the Console (23) to the Console Bracket (63) with four M4 x 16mm Screws (42). Be careful to avoid pinching the cable and wires. Make sure that the resistance knob is turned to the lowest setting before continuing. 5 23 Console Wire 44 Resistance Knob 42 Ground Wire 63 Control Cable 42 2 6 3. Measure your heart rate if desired. Note: If there are thin sheets of plastic on the four metal contacts of the pulse sensor, peel off the plastic. Handle Pulse Sensor To use the pulse sensor, hold the handle on the console, with your right palm covering the two right contacts and your left palm covering the two left contacts. Avoid moving your hands. When your pulse is detected, the heart-shaped indicator in the display will flash each time your heart beats and two dashes (- -) will appear. After a moment, your heart rate will be shown. For the most accurate heart rate reading, continue to hold the handgrips for about 15 seconds. WARNING: The pulse sensor is not a medical device. Various factors may affect the accuracy of heart rate readings. The pulse sensor is intended only as an exercise aid in determining heart rate trends in general. 4. To turn off the power, simply wait for a few minutes. The console has an auto-off feature. If the pedals are not moved and the console buttons are not pressed for a few minutes, the power will automatically turn off to conserve the batteries. 11
-
 1
1 -
 2
2 -
 3
3 -
 4
4 -
 5
5 -
 6
6 -
 7
7 -
 8
8
 |
 |