Weslo Summit St100 English Manual - Page 4
Assembly
 |
View all Weslo Summit St100 manuals
Add to My Manuals
Save this manual to your list of manuals |
Page 4 highlights
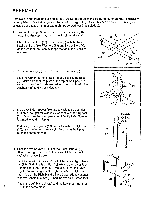
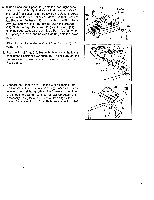
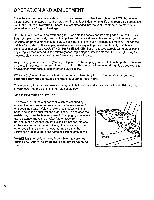
ASSEMBLY Remove all parts from the packing carton. Do not dispose of the packing materials until assembly Is completed. Read all steps carefully before beginning. Assembly can be completed using an adjustable wrench, a hammer and a phillips screwdriver (not included). 1. Press an Endcap (9) on each end of the Stabilizer (38). (Note: The Endcaps may be on the Stabilizer already.) 9 36 7 8 Attach the Stabilizer (38) to the Base (8) with the two Stabilizer Bolts (39), Washers (36) and Nylock Nuts (7). Make sure that the Base overlaps the top of the Stabilizer as shown. 39 7 36 38 9 2. Press an Endcap (9) onto each side of the Base (8). Slide the Upright (6) onto the threaded bolts in the Base (8). Make sure that the plate at the top of the Upright is angled in the direction shown. Attach the Upright with four Washers (36) and Nylock Nuts (7). 6 r" --1-36 36 8 9 3. Slide a Cylinder Spacer (19) and a Resistance Cylinder (20) onto the right resistance cylinder axle on the Upright (6). Make sure that the open side of the Cylinder Spacer is turned toward the Upright. Slide a Cylinder Spacer (19), and a Resistance Cylinder (20), onto the left resistance cylinder axle on the Upright (6) In the same manner. 4. Back the two Screws (2) out of the Right Handrail (5). Attach the Right Handrail to the Lower Right Handrail (35) with the two Screws. Back the two Axle Screws (13) out of the Lower Right Handrail (35). Slide the Right Handrail (5) and the Lower Right Handrail onto the Upright (6). Make sure that the Lower Right Handrail is against the right Resistance Cylinder (20). Attach the Right Handrail and Lower Right Handrail with two Handrail Screws (31) and the two Axle Screws (13). Attach the Left Handrail (22) and the Lower Left Handrail 4 (34) in the same manner. Resistance Cylinder Axle 6 19 20 20 22 6 34 20 5 1 2 "0-13 35 13
-
 1
1 -
 2
2 -
 3
3 -
 4
4 -
 5
5 -
 6
6 -
 7
7 -
 8
8 -
 9
9 -
 10
10 -
11
-
12
 |
 |
