Weslo Summit St100 English Manual - Page 8
Trouble, Shooting, Maintenance
 |
View all Weslo Summit St100 manuals
Add to My Manuals
Save this manual to your list of manuals |
Page 8 highlights
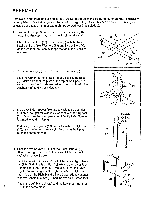
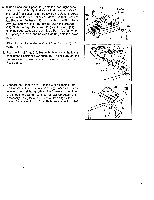
2. Select one of the five modes: SCAN mode-When the power is turned on, the SCAN mode will be selected automatically. One mode indicator will show that the SCAN mode has been selected, and a second mode indicator will show which mode is currently displayed. The SCAN mode can also be selected by repeatedly pressing the MODE button. SPEED, TIME, DISTANCE or CALORIES mode-These modes can be selected by repeatedly pressing the mode button. A mode indicator will show which mode has been selected. The modes are selected in the following order: SPEED, TIME, DISTANCE, CALORIE and SCAN. 3. To reset the modes, turn the power off and then on again by pressing the on/off button twice. 4. To turn the power off, press the on/off button. Note: If the stepper pedals are not moved and the monitor buttons are not pressed for four minutes, the power will turn off automatically. TROUBLE-SHOOTING AND MAINTENANCE Inspect and tighten all parts each time you use the stepper. The stepper can be cleaned using a soft cloth and mild, non-abrasive detergent. Do not allow liquid to come in contact with the console. CONSOLE If the console does not function properly, or if the display becomes faint, the batteries should be replaced. See BATTERY INb ALLAHION on page 7. If the electronic monitor displays incorrect feedback, the Reed Switch (3) should be repositioned. Loosen the Reed Switch Screw (4). Push the Left Pedal Arm (16) down until it is parallel with the floor. Adjust the position of the Reed Switch so there is a 3/16" gap between the Reed Switch and the 4 Magnet (14). Tighten the Reed Switch Screw. 16 14 3 If the electronic monitor displays no feedback when the SPEED, DISTANCE or CALORIE modes are selected, the Sensor Wire (3) should be checked. Remove the four 3/4" Screws (2) attaching the Console (1) to the Upright (6). Make sure the Sensor Wire is plugged fully into the wire protruding from the Console. Reattach the Console to the Upright. 8 32 3 \ \ 6 3 2
-
 1
1 -
2
-
 3
3 -
 4
4 -
 5
5 -
 6
6 -
 7
7 -
 8
8 -
 9
9 -
 10
10 -
 11
11 -
 12
12
 |
 |
