Weslo Summit St100 English Manual - Page 6
Operation, Adjustment
 |
View all Weslo Summit St100 manuals
Add to My Manuals
Save this manual to your list of manuals |
Page 6 highlights
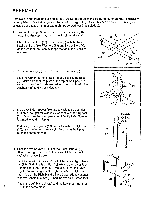
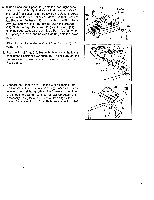
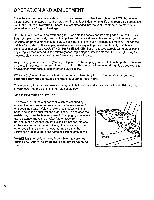
OPERATION AND ADJUSTMENT Place the stepper on a level surface. Keep the console out of direct sunlight or the LCD display may be damaged. The stepper features precision hydraulic cylinders for long life and trouble-free operation; due to the nature of hydraulic cylinders, it is recommended that the floor underneath the stepper be covered in case of slight oil leakage. Hold the handlebars with an overhand grip. Step onto the pedals and let both pedals sink to the floor. Begin stepping, alternately pressing the right and left pedals down with a smooth, continuous motion. Because the pedals move independently, it is important to maintain a continuous motion. Change'the height of your step or the stepping resistance as necessary until you can comfortably maintain a continuous motion (see ADJUSTING THE RESISTANCE). For an effective aerobic workout, exercise physiologists recommend taking relatively short, rapid steps at low resistance. For strengthening the muscles, slower steps at medium resistance are more effective. As you step, you can exercise your upper leg muscles by keeping your feet flat on the pedals. To focus on the calf muscles, rise on your toes as you step. Stand erect or lean forward slightly as you exercise; always keep your back straight in order to avoid injury. WARNING: Always keep your feet on the pedals when stepping, or the pedals may become separated from the resistance cylinders, causing serious injury. The accessory tray on the console is designed to hold a drink and your exercise towel. Slide a corner of your towel into the slot in the right side of the tray. ADJUSTING THE RESISTANCE The resistance of the stepper pedals can be changed by moving the resistance brackets. Change the resistance of one pedal at a time. Hold the resistance bracket with one hand, and lift the pedal with the other hand. To decrease the resistance, move the bracket closer to the upright; to increase the resistance, move the bracket farther away from the upright. Make sure that the bracket is fully inserted into one of the slots under the pedal. Change the resistance of the other pedal in the same manner, making sure that the resistance brackets are in the same position on both pedals. WARNING: The resistance cylinders become very hot during use. Allow the cylinders to cool before touching them. Resistance Bracket II 0 6
-
 1
1 -
 2
2 -
 3
3 -
 4
4 -
 5
5 -
 6
6 -
 7
7 -
 8
8 -
 9
9 -
 10
10 -
 11
11 -
 12
12
 |
 |
