WestBend 41072 Instruction Manual - Page 12
Clean Before Using, How To Use-basic Steps In Making Bread
 |
View all WestBend 41072 manuals
Add to My Manuals
Save this manual to your list of manuals |
Page 12 highlights
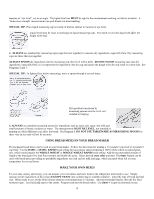
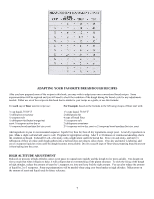
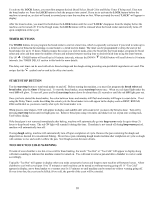
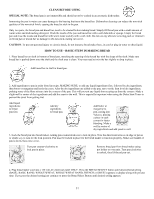
CLEAN BEFORE USING SPECIAL NOTE: The bread pan is not immersible and should never be washed in an automatic dishwasher. Immersing the pan in water can cause damage to the bearing that turns the knead bar. Dishwasher cleaning can reduce the non-stick qualities of the non-stick finish, causing the bread to stick in the pan. Only two parts, the bread pan and knead bar, need to be cleaned before making bread. Simply fill bread pan with a small amount of warm water and dishwashing detergent. Wash the inside of the pan and knead bar with a soft dishcloth or sponge. Empty the bread pan and rinse the inside and knead bar with warm water and dry with a soft cloth. Do not use any abrasive scouring pads or cleansers on bread pan or knead bar as damage to the non-stick coating can occur. CAUTION: To prevent personal injury or electric shock, do not immerse bread maker base, its cord or plug in water or other liquid. HOW TO USE-BASIC STEPS IN MAKING BREAD 1. Place knead bar on shaft in bottom of bread pan, matching the opening of the knead bar with the shape of the shaft. Make sure knead bar is pushed down onto the shaft and the shaft area is clean. You may need to twist the bar slightly to drop in place. Add knead bar to shaft in bread pan. 2. Add ingredients to pan in order listed in recipe, MAKING SURE, to add any liquid ingredients first, followed by dry ingredients, then butter or margarine and lastly the yeast. After the dry ingredients are added to the pan, tap to settle, then level dry ingredients, pushing some of the flour mixture into the corners of the pan. This will prevent any liquid from seeping up from the corners. Make a slight well in center of dry ingredients and add the yeast to the well. This is especially important when using the Delay Start Timer to prevent the yeast from getting wet. Add liquid ingredients to bread pan first. Add dry ingredients to bread pan. Add butter or margarine to pan, cutting into 4 pieces, placing a piece in each corner for faster blending. Make a well in center of dry ingredients and add yeast to well. 3. Lock the bread pan into bread maker, turning pan counterclockwise to lock in place. Note the directional arrows on edge of pan as to which way to turn for the lock position. Pan must be locked in place for the bread maker to function properly. Make sure handle of pan is down, then close cover. Turn pan counter-clockwise to lock pan in place. Remove bread pan from bread maker using pot holder or oven mitt. Turn pan clockwise to unlock, then lift bread pan out. 4. Plug bread maker cord into a 120 volt AC electrical outlet ONLY. Press the BREAD SELECT button until desired bread setting (BASIC, BASIC RAPID, WHOLE WHEAT, WHOLE WHEAT RAPID, FRENCH or SWEET) appears in display along with process time. If you pass the desired setting just continue to press the Bread Select Button until desired setting appears. 11
-
 1
1 -
2
-
3
-
4
-
5
-
6
-
 7
7 -
 8
8 -
 9
9 -
 10
10 -
 11
11 -
 12
12 -
 13
13 -
 14
14 -
 15
15 -
 16
16 -
 17
17 -
18
-
19
-
20
-
21
-
22
-
23
-
24
-
25
-
26
-
27
 |
 |