WestBend 41072 Instruction Manual - Page 14
How To Use Delay Start Timer
 |
View all WestBend 41072 manuals
Add to My Manuals
Save this manual to your list of manuals |
Page 14 highlights
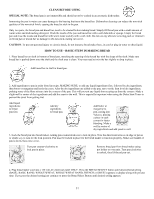
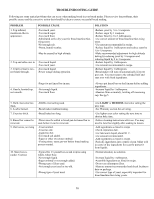
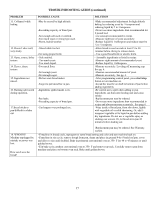
Follow these steps for using the DOUGH setting: 1. Place knead bar on shaft in bottom of bread pan, matching the opening of the knead bar with the shape of the shaft. Make sure knead bar is pushed down onto shaft and the shaft area is clean. 2. Add ingredients to pan in order listed in recipe, MAKING SURE to add any liquid ingredients first, followed by dry ingredients, then butter or margarine and lastly the yeast. After dry ingredients are added to the pan, tap pan several times to settle the ingredients, then push some of the flour mixture into the corners of pan. This prevents liquid from seeping up from the corners. Make a slight well in center of flour and add the yeast to well. This is especially important when using the Delay Start Timer to prevent the yeast from getting wet. 3. Lock bread pan into bread maker, turning the pan counterclockwise to lock in place. Pan must be locked in place for the bread maker to function properly. Make sure handle of pan is down, and then close cover. 4. Plug bread maker cord into a 120 volt AC electrical outlet ONLY. Press the BREAD SELECT button until the word DOUGH appears in display. The process time of 1:20 (1 hour, 20 minutes) will also appear in display. If you pass by the DOUGH setting, continue to press the BREAD SELECT button until DOUGH appears. Program Delay Start Timer if desired. See instructions on this page. After the bread maker has been turned on, the programmed settings cannot be changed. If you wish to change settings, hold LOCK button down first for three seconds, then hold START/STOP button down until red ON light goes out. Then program control as desired and turn back on. 5. Press START/STOP button once to turn bread maker on. Press LOCK button, if featured. When turned on, the red light under the word ON will glow; the colon between 1:20 or programmed time will begin to flash. The dough will mix, then be kneaded and allowed to rise before being stirred down. At this time, 0:00 will appear in the display and an audible alert will sound to let you know the dough is done. Remove the dough from the pan and follow recipe directions to complete the recipe. The bread maker will automatically turn itself off after the dough cycle is complete, the red ON light will go out and the "LOCK button will automatically be released. Unplug cord from electrical outlet after cycle is complete. HOW TO USE DELAY START TIMER The Delay Start Timer can be used at ALL SIX settings as well as the DOUGH setting. Follow steps 1-5 for "Making Bread" on pages 11-12 or Steps 1-5 for making Dough" on pages 12-13. Use only recipes with the symbol with the delay start timer as these recipes contain non-perishable ingredients that will not spoil when left at room temperature for several hours before the dough making process begins. NEVER USE PERISHABLE INGREDIENTS (milk, eggs, cheese, yogurt, etc.) WITH THE DELAY START TIMER AS THESE INGREDIENTS CAN SPOIL WHEN HELD AT ROOM TEMPERATURE SEVERAL HOURS BEFORE THE BREAD MAKER TURNS ON. After completing above-mentioned steps, continue with steps below: 1. After the bread Select and Bread Color choices have been made (with exception of Dough), determine the number of hours and minutes between the time you will start the bread maker to the time you wish to have the bread or dough ready. For Example: You have selected the Basic Rapid Setting, Medium crust color and the process time of 3:00 appears in the display. You are ready to start the machine at 9:30 and want the bread done at 6:00. The number of hours and minutes between 9:30 and 6:00 is 8½ hours or 8:30. 8:30 is the time you enter into the timer. Press and hold the (up) timer button to scroll the time up in 10 minute increments until 8:30 appears in display. If you go past 8:30, use the (down) timer button to scroll down in 10 minute increments until you reach 8:30. The maximum time for timer is 13 hours (13:00). The bread or dough process time is automatically figured into the delay time, as this is the time from which you begin to count up. 2. Press START/STOP button once to turn the bread maker on. Press LOCK button if featured. The red ON light will come on, the colon between hours and minutes will flash and the timer will count down by 1-minute intervals. When the timer counts down to the bread or dough select process time (3:00) as in above example, the bread making process will begin. 13
-
 1
1 -
2
-
3
-
4
-
5
-
6
-
7
-
8
-
 9
9 -
 10
10 -
 11
11 -
 12
12 -
 13
13 -
 14
14 -
 15
15 -
 16
16 -
 17
17 -
 18
18 -
 19
19 -
20
-
21
-
22
-
23
-
24
-
25
-
26
-
27
 |
 |