WestBend 41080 Instruction Manual - Page 15
On/off Button, Too Hot/too Cold Warning, How Knead Bars Work, Clean Before Using
 |
View all WestBend 41080 manuals
Add to My Manuals
Save this manual to your list of manuals |
Page 15 highlights
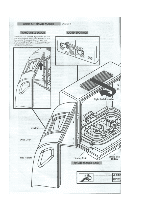
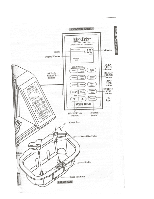
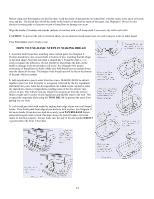
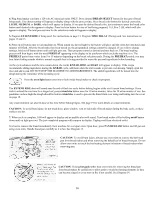
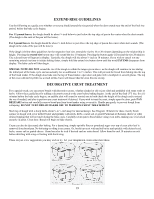
ON/OFF BUTTON Use this button to turn the machine on and off. Before starting the machine, you must first program the BREAD SELECT, bread color, loaf size, plus extend rise and TIME DELAY, if being used. Then press the on/off button once to turn on. When on, the red signal light by the button will glow and remain lit until the bread maker is turned off. To turn bread maker off, press and hold on/off button down for about four (4) seconds or until the red light goes out. Once you have started the machine, the colon between the hours and minutes will begin to flash and the minutes will begin to count down. If not using the TIME DELAY, words describing the actual cycle the bread maker is in will appear in display, such as PREHEAT, KNEAD, RISE, and BAKE, so you know exactly what cycle the bread maker is in. The process time continues to count down in minutes so you always know how much time remains before the bread will be done. When the process time elapses, 0:00 will appear in the display and an audible alert will sound to let you know the bread is done. Turn bread maker off by holding down the on/off button until the red on light goes out. Remove the bread pan using oven mitts and place hot loaf of bread onto a rack to cool before slicing. If the bread pan is not removed from bread maker immediately after baking, the machine will automatically go into a KEEP WARM mode for up to three (3) hours to keep the bread warm. The red on light will remain lit during this time, plus the words KEEP WARM will appear in the display. If the machine is not turned off during this three (3) hour period, the machine will automatically turn off. If using the dough or quick bread settings, the machine will turn off automatically upon the completion of the cycle, the red light will go out and an alert will sound. Remove pan containing the dough or quick bread immediately using oven mitts. For dough, finish as recommended in recipe being prepared. For quick bread, cool bread in pan for time recommended in recipe to ensure release from pan when removed. TOO HOT/TOO COLD WARNING If inside of oven chamber is too hot or too cold for bread making, the words "Too Hot" or "Too Cold" will appear in display along with alert sounding to indicate that machine cannot be turned on. You will need to remove pan and allow chamber to cool or warm accordingly. Typically "Too Hot" will appear in display when you make consecutive loaves and forget to turn machine off between loaves. Allow chamber to cool with cover open 10 to 15 minutes or until machine can be turned on without warning going off. If "Too Cold" appears in display, move bread maker to a warmer area for 15 minutes or until machine can be turned on without warning going off. If oven is too hot, the yeast can be killed; if too cold, the growth of the yeast will be retarded. HOW KNEAD BARS WORK The knead bars in your bread maker are unique as the blades are designed to move up and down depending on the direction the motor is turning. For kneading, the blades will be in the up position to provide thorough kneading action, however, near the end of the knead cycle, the motor will stop and reverse direction so the knead bars will lie flat in the pan, leaving less of an imprint in the bottom of the bread. In order to ensure that the blades can move freely up and down, be sure to keep the metal hinge pin area on hubs clean. See "CLEAN AFTER EACH USE" section on page 20. CLEAN BEFORE USING Press PAN RELEASE button to unlock pan from bread maker. Lift pan out. SPECIAL NOTE: The bread pan is not immersible and should never be washed in an automatic dishwasher. Immersing the pan in water can cause damage to the bearings that turn the knead bars. Dishwasher cleaning can reduce the non-stick qualities of the coating, causing the bread to stick. 14
-
 1
1 -
2
-
3
-
4
-
5
-
6
-
7
-
8
-
9
-
 10
10 -
 11
11 -
 12
12 -
 13
13 -
 14
14 -
 15
15 -
 16
16 -
 17
17 -
 18
18 -
 19
19 -
 20
20 -
21
-
22
-
23
-
24
-
25
-
26
-
27
-
28
-
29
-
30
-
31
-
32
-
33
-
34
-
35
-
36
-
37
-
38
-
39
-
40
-
41
-
42
-
43
-
44
-
45
-
46
-
47
-
48
-
49
-
50
-
51
-
52
-
53
-
54
-
55
-
56
 |
 |