WestBend 41080 Instruction Manual - Page 17
Bread Select, Light, Medium, Extend Rise, Time Delay, Preheat, Knead, Rise, Knead, Oven Light,
 |
View all WestBend 41080 manuals
Add to My Manuals
Save this manual to your list of manuals |
Page 17 highlights
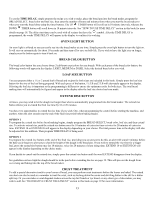
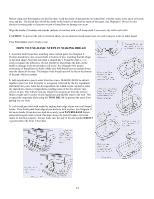
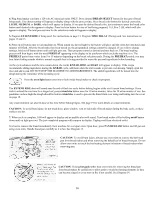
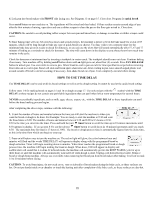
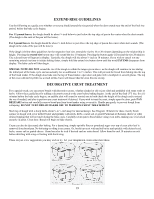
4. Plug bread maker cord into a 120 volt AC electrical outlet ONLY. Press desired BREAD SELECT button for the type of bread being made. The chosen setting will appear in display along with the process time. Press bread color button for desired crust color, LIGHT, MEDIUM, or DARK, which will appear in display. If you pass by desired bread color, just continue to press the bread color button until desired color appears in display. Press loaf size button for size of loaf being prepared, 1½ LB or 2 LB, which will also appear in display. The total process time for the selections made will appear in display. 5. Program EXTEND RISE if being used. See instructions on page 13. Program TIME DELAY if being used. See instructions on pages 12 and 13. 6. Press on/off button once to turn machine on. When turned on, the red light by the button will glow and the colon between hours and minutes will flash. After the bread maker has been turned on, the programmed settings cannot be changed. If you wish to change settings, hold on/off button down until red light goes out. Then program control as desired and turn back on. The bread making process will then begin; with the word PREHEAT appearing in the display to let you know which cycle the machine is in. The PREHEAT period time varies from 5 to 15 minutes depending on the bread selection made. During the PREHEAT period; you may hear faint clicking sounds which is normal as gentle heat is being provided to warm the pan and ingredients before kneading. As the cycle advances and the time counts down, the words KNEAD, RISE and BAKE will appear in display. If the recipe recommends adding ingredients during the KNEAD cycle, add them when the alert sounds to prevent over-mixing. Simply open the door and add to pan. DO NOT STOP THE MACHINE TO ADD INGREDIENTS. The added ingredients will be mixed into the dough during the remainder of the kneading cycle. Press the oven light button any time to look inside bread maker to check its progress. The EXTEND RISE alert will sound near the end of final rise cycle before baking begins at the six (6) yeast bread settings. If you wish to extend the rise time for a larger loaf, press extend rise button once for 10 extra minutes; twice for 20 extra minutes of rise. See guidelines on how high the dough should be before extend rise is used to prevent the bread from over rising and baking into the cover on page 19. Any crust treatment can also be done at this time before baking begins. See page 19 for more details on crust treatments. CAUTION: To avoid burn injury, do not touch door, glass window, vent or sidewalls of bread maker during the bake cycle, as these surfaces are hot. 7. When cycle is complete, 0:00 will appear in display and an audible alert will sound. Turn bread maker off by holding on/off button down until on light goes out. The just completed program will reappear in display. Unplug cord from electrical outlet. It is best to remove the bread immediately from machine for a crispier crust. Open door, press PAN RELEASE button and lift pan out using oven mitts. Handle bread pan carefully as it is hot. See Diagram 13. CAUTION: To avoid burn injury, always use oven-mitts to remove the hot bread pan from bread maker and when removing the baked loaf of bread from pan. Do not allow oven mitts to touch the hot heating element in bottom of bread maker when removing pan. CAUTION: If using hot pads rather than oven-mitts for removing hot bread pan from bread maker, be careful not to allow pads to touch hot heating elements as they can become singed or even start on fire if not careful. See Diagram 14. 16
-
 1
1 -
2
-
3
-
4
-
5
-
6
-
7
-
8
-
9
-
10
-
11
-
 12
12 -
 13
13 -
 14
14 -
 15
15 -
 16
16 -
 17
17 -
 18
18 -
 19
19 -
 20
20 -
 21
21 -
 22
22 -
23
-
24
-
25
-
26
-
27
-
28
-
29
-
30
-
31
-
32
-
33
-
34
-
35
-
36
-
37
-
38
-
39
-
40
-
41
-
42
-
43
-
44
-
45
-
46
-
47
-
48
-
49
-
50
-
51
-
52
-
53
-
54
-
55
-
56
 |
 |