WestBend 5500 Instruction Manual - Page 10
Cleaning Your Appliance
 |
View all WestBend 5500 manuals
Add to My Manuals
Save this manual to your list of manuals |
Page 10 highlights
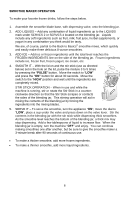
CLEANING YOUR APPLIANCE 1. Switch to "OFF" and unplug from electrical outlet. 2. Wipe the motor base with a damp cloth or sponge. To remove stubborn spots, use a mild, non-abrasive cleanser. 3. Remove blade base and rubber gasket from the blending jar. Unscrew and disassemble the dispensing valve. Carefully wash all parts except the motor base in warm, soapy water, rinse and dry thoroughly. To prolong the life of your appliance, do not wash parts in the dishwasher. CLEANING THE DISPENSING VALVE 1. Remove the valve from the smoothie blade base by unscrewing the entire valve counter-clockwise. 2. Remove the cap from the valve body by unscrewing it counter-clockwise. 3. Squeeze cap and stopper together and slide the lever off the stopper pin. 4. Remove the spring. 5. Remove the stopper and stopper pin by pulling the rubber rim of the stopper. The stopper and pin are tightly fit and need not be separated. 6. Clean all parts in warm, soapy water, allow to dry thoroughly and reassemble in the order shown. Lever Cap Spring Stopper Pin Stopper Valve Body 10
-
 1
1 -
2
-
3
-
4
-
 5
5 -
 6
6 -
 7
7 -
 8
8 -
 9
9 -
 10
10 -
 11
11 -
 12
12 -
 13
13 -
 14
14 -
 15
15 -
16
-
17
-
18
-
19
-
20
-
21
-
22
-
23
-
24
-
25
-
26
-
27
-
28
-
29
-
30
-
31
-
32
-
33
-
34
-
35
-
36
-
37
-
38
-
39
-
40
-
41
-
42
-
43
-
44
-
45
-
46
-
47
-
48
 |
 |
