Western Digital My Cloud DL2100 User Manual - Page 61
Camera Backups, Creating a Camera Backup
 |
View all Western Digital My Cloud DL2100 manuals
Add to My Manuals
Save this manual to your list of manuals |
Page 61 highlights
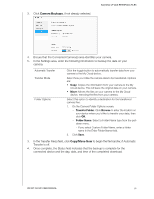
BACKING UP AND RETRIEVING FILES Backup Type From the drop-down menu, select the type of backup you'd like to perform. Options include: • Overwriting existing file(s): Overwrites files in the target folder that have the identical name as your source file. • Full Backup: Creates a separate folder containing all of the backup data each time the backup is performed. • Incremental Backup: Overwrites files with source files that are newer then the target files. 9. In the Local Path field, enter a path for your backup on your WD My Cloud server. Click Browse to browse to a location for your backup on the device. (Example Volume_1/backup) 10. Click the toggle button to activate the Autoupdate feature. This automatically updates your backup based on a schedule you create. If you activate the Autoupdate feature: - Select the Autoupdate schedule: Daily, Weekly, or Monthly - Select the Autoupdate Time from the drop-down menu (Daily option). Select Autoupdate Date and Time from the drop-down menus (Weekly or Monthly option). 11. If you don't select Autoupdate, in the Backup Now field, indicate whether you want to begin the backup now. Select Yes to begin your backup now. 12. Click Next. 13. Review your settings and click Finish. Your Amazon S3 Cloud backup is created. The new job displays in the Amazon S3 Queue section of the Amazon S3 Backup page. 14. Access your Amazon S3 Cloud backup bucket to view your device backups. Camera Backups Camera backups allow you to backup the data on your camera to the WD My Cloud device. Once downloaded, users can navigate to the location where the camera data was saved to access the data, if they have access to that share. Creating a Camera Backup Use the following steps to back up your camera to the My Cloud device. 1. Ensure that your camera is connected to your My Cloud device. 2. On the Navigation bar, click Backups to display the Backups screen. WD MY CLOUD USER MANUAL 55
-
 1
1 -
2
-
3
-
4
-
5
-
6
-
7
-
8
-
9
-
10
-
11
-
12
-
13
-
14
-
15
-
16
-
17
-
18
-
19
-
20
-
21
-
22
-
23
-
24
-
25
-
26
-
27
-
28
-
29
-
30
-
31
-
32
-
33
-
34
-
35
-
36
-
37
-
38
-
39
-
40
-
41
-
42
-
43
-
44
-
45
-
46
-
47
-
48
-
49
-
50
-
51
-
52
-
53
-
54
-
55
-
 56
56 -
 57
57 -
 58
58 -
 59
59 -
 60
60 -
 61
61 -
 62
62 -
 63
63 -
 64
64 -
 65
65 -
 66
66 -
67
-
68
-
69
-
70
-
71
-
72
-
73
-
74
-
75
-
76
-
77
-
78
-
79
-
80
-
81
-
82
-
83
-
84
-
85
-
86
-
87
-
88
-
89
-
90
-
91
-
92
-
93
-
94
-
95
-
96
-
97
-
98
-
99
-
100
-
101
-
102
-
103
-
104
-
105
-
106
-
107
-
108
-
109
-
110
-
111
-
112
-
113
-
114
-
115
-
116
-
117
-
118
-
119
-
120
-
121
-
122
-
123
-
124
-
125
-
126
-
127
 |
 |
